Introduction
Lasagna, a dish that epitomizes comfort food, has its roots deeply embedded in Italian cuisine. This layered pasta dish has a rich history that dates back to ancient Greece, where a similar dish called “Laganon” was made from sheets of dough cut into strips and layered with sauce. Over time, lasagna evolved through the culinary traditions of Italy, particularly in regions like Emilia-Romagna, where it has become a beloved staple. Today, lasagna is not just a meal; it’s a symbol of family gatherings, celebrations, and the warm embrace of home-cooked comfort.
What sets homemade lasagna apart is the love and care infused into each layer. Unlike store-bought versions, which can often be lacking in flavor and freshness, a homemade lasagna allows you to control every ingredient, ensuring that each bite is bursting with flavor. The combination of al dente pasta sheets, rich sauces, and a variety of cheeses creates a symphony of textures and tastes that simply cannot be matched.
In this recipe, we will delve into the art of crafting the ultimate homemade lasagna, emphasizing the importance of fresh ingredients and traditional methods that contribute to a dish worth sharing with family and friends. By preparing your lasagna from scratch, you not only honor the culinary traditions of Italy but also create a masterpiece that reflects your personal touch.
Understanding the Ingredients
The Key Components of Lasagna
Lasagna is made up of several key components that, when combined, create a dish filled with complex flavors. Each layer contributes to the overall experience, and understanding these elements is crucial for achieving the perfect lasagna.
Overview of Pasta Sheets: Types and Textures
At the heart of any lasagna lies the pasta sheets. Traditionally, lasagna is made with wide, flat noodles that can hold up to the weight of the layers above. When it comes to choosing pasta, you have a few options:
1. Dried Lasagna Sheets: These are widely available and can be used straight from the package. They require pre-cooking unless specified as “oven-ready.”
2. Fresh Lasagna Sheets: Made from scratch or purchased from specialty stores, fresh pasta offers a tender bite and a more authentic texture. They often don’t require pre-cooking, making the assembly process quicker.
3. Whole Wheat or Gluten-Free Options: For those with dietary restrictions, whole wheat or gluten-free pasta sheets are excellent alternatives. Just be mindful of their cooking times and texture differences.
Choosing the right type of pasta can enhance the overall texture of your lasagna, allowing it to effortlessly meld with the rich layers of sauce and cheese.
Exploring the Meat Choices: Ground Beef, Sausage, or Vegetarian Alternatives
The meat layer is another essential component of lasagna, adding depth and richness to the dish. Traditional lasagna often features:
– Ground Beef: This is the classic choice, providing a hearty flavor that pairs well with the sauce.
– Italian Sausage: For a spicier kick, using Italian sausage—either sweet or spicy—can elevate the flavor profile.
– Vegetarian Alternatives: If you prefer a meatless option, consider using mushrooms, spinach, or a blend of vegetables. You can also use lentils or plant-based crumbles to create a satisfying texture.
The meat or meat alternative should be well-seasoned and cooked to perfection, ensuring that it brings a robust flavor to each layered bite.
The Role of Cheeses: Ricotta, Mozzarella, and Parmesan
Cheese is crucial in lasagna, providing creaminess and flavor that hold the layers together. The common cheeses used include:
– Ricotta Cheese: This creamy cheese is often mixed with egg and herbs, adding a delicate texture and flavor to the layers.
– Mozzarella Cheese: Known for its meltability, mozzarella is the cheese that brings the gooey, stretchy goodness that lasagna is famous for.
– Parmesan Cheese: This hard cheese adds a salty, nutty flavor that complements the other cheeses and enhances the overall richness of the dish.
A successful cheese blend will provide a balance of creaminess and flavor, making each bite irresistible.
The Importance of Sauce: Marinara vs. Béchamel
The sauce is the lifeblood of lasagna, tying all the layers together with its rich flavors. There are two primary types of sauces used:
– Marinara Sauce: A classic tomato-based sauce is often used in traditional lasagna recipes. It’s simple to prepare and can be made from scratch using fresh tomatoes, garlic, onions, and herbs.
– Béchamel Sauce: This white sauce, made from butter, flour, and milk, is often used in variations of lasagna, particularly in regions like Emilia-Romagna. It adds a creamy richness that complements the other flavors beautifully.
Choosing between these sauces often depends on personal preference or regional traditions. Regardless of your choice, a well-made sauce is vital for elevating the overall flavor of the lasagna.
Selecting Fresh Ingredients
The quality of your lasagna largely depends on the freshness of your ingredients. Here are some tips for selecting the best components:
– Produce for Sauce: When preparing your marinara sauce, opt for ripe, in-season tomatoes for the best flavor. Look for tomatoes that are firm yet slightly yielding to ensure they are ripe. Fresh herbs, like basil and oregano, should be fragrant and vibrant.
– Cheese Selection: For cheeses, look for whole milk varieties when possible, as they provide a creamier texture. Purchase cheese from the deli or specialty cheese shop for the freshest options, and avoid pre-shredded cheese, which often contains anti-caking agents that affect meltability.
– Meat Choices: If you opt for meat, choose high-quality ground beef or sausage from a reputable butcher. Look for lean cuts that have a good balance of fat for flavor. For vegetarian options, select organic produce for the best taste and nutrition.
Tips for Choosing High-Quality Produce for Sauce
1. Color: Choose tomatoes that are deep red and free from blemishes or bruises.
2. Texture: Ripe tomatoes should feel heavy for their size and slightly soft.
3. Smell: Fresh herbs should have a strong, fragrant aroma, indicating their freshness.
4. Seasonality: Whenever possible, use seasonal ingredients for optimal flavor.
By prioritizing fresh ingredients, you ensure that your homemade lasagna is not only delicious but also nourishing.
Preparation Steps for the Perfect Lasagna
Making the Sauce
The first step in crafting your ultimate homemade lasagna is preparing the sauce. A rich marinara sauce is ideal for this dish, as it brings a bright, tangy flavor that perfectly complements the layers of cheese and pasta. Here’s how to create a flavorful marinara sauce from scratch.
Ingredients Needed for the Marinara Sauce
– 2 tablespoons olive oil
– 1 medium onion, finely chopped
– 3 cloves garlic, minced
– 28 ounces canned whole tomatoes (preferably San Marzano)
– 1 teaspoon sugar (optional)
– Salt and pepper, to taste
– Fresh basil leaves, torn
– 1 teaspoon dried oregano
Step-by-Step Guide to Preparing a Rich, Flavorful Sauce
1. Heat the Olive Oil: In a large saucepan, heat the olive oil over medium heat. Once hot, add the chopped onions and sauté until translucent, about 5 minutes.
2. Add Garlic: Stir in the minced garlic and cook for another 1-2 minutes, being careful not to let it burn.
3. Incorporate Tomatoes: Add the canned tomatoes, crushing them by hand or with a spoon to break them down. If you prefer a smoother sauce, use an immersion blender at this stage.
4. Season the Sauce: Add sugar (if using), salt, pepper, torn basil leaves, and dried oregano. Stir well to combine.
5. Simmer: Bring the sauce to a gentle boil, then reduce the heat to low. Let it simmer for at least 30 minutes, stirring occasionally, to allow the flavors to meld.
6. Adjust Seasoning: Taste the sauce and adjust seasoning as necessary before removing it from heat.
By preparing your sauce from scratch, you ensure a depth of flavor that enhances the lasagna, making it truly special.
Preparing the Meat
If you’ve chosen to include meat in your lasagna, this step is essential for maximizing flavor. Here’s how to prepare your meat layer:
Choosing the Right Meat and Alternatives
– If using ground beef, opt for lean ground beef (80/20) for a balance of flavor and fat.
– If using Italian sausage, remove the casing and crumble it for even cooking.
– For vegetarian options, finely chop mushrooms, zucchini, or spinach for added flavor and nutrition.
Cooking Techniques for Maximizing Flavor in the Meat Layer
1. Brown the Meat: In a skillet over medium-high heat, add a drizzle of olive oil and heat until shimmering. Add the ground meat or sausage and cook until browned, breaking it up with a spatula. This step is crucial for developing flavor through the Maillard reaction.
2. Seasoning: Once browned, drain excess fat if necessary. Season the meat with salt, pepper, and herbs like thyme or Italian seasoning for added depth.
3. Incorporate Vegetables: If using vegetables, add them to the skillet once the meat is browned. Cook until the vegetables are tender, about 5-7 minutes.
4. Combine with Sauce: Mix the cooked meat and vegetables with your marinara sauce for a cohesive filling.
Creating a flavorful meat layer ensures that your lasagna has a savory depth that pairs beautifully with the cheeses and pasta.
Crafting the Cheese Mixture
The cheese layer is what makes lasagna indulgent and satisfying. Here’s how to create a rich and creamy cheese mixture:
Ingredients for the Ricotta Mixture
– 15 ounces ricotta cheese
– 1 large egg
– 1/2 cup grated Parmesan cheese
– Salt and pepper, to taste
– Fresh parsley or basil, chopped (optional)
How to Achieve the Perfect Texture and Flavor
1. Combine Ingredients: In a bowl, mix the ricotta cheese, egg, grated Parmesan, salt, pepper, and herbs (if using).
2. Blend for Creaminess: Use a fork to blend until smooth and creamy. The egg helps bind the mixture, making it easier to spread between layers.
3. Taste and Adjust: Taste the mixture and adjust seasoning as necessary for the perfect flavor.
Creating a well-seasoned cheese mixture is pivotal in ensuring that every bite of lasagna is creamy and flavorful.
Assembling the Lasagna
Now that you have prepared your sauce, meat, and cheese mixtures, it’s time to assemble your lasagna. This step is where all your hard work comes together to create a beautiful, layered dish that will delight your family and friends.
1. Preheat the Oven: Preheat your oven to 375°F (190°C).
2. Layering: In a 9×13 inch baking dish, start with a thin layer of marinara sauce at the bottom to prevent sticking. Then, add a layer of pasta sheets, followed by a layer of the meat sauce, a layer of the ricotta mixture, and a layer of mozzarella cheese. Repeat the layers until you reach the top of the dish, finishing with a layer of pasta topped with sauce and mozzarella cheese.
3. Cover: Cover the baking dish with aluminum foil, making sure it doesn’t touch the cheese on top.
4. Bake: Bake in the preheated oven for 25 minutes. Then, remove the foil and bake for an additional 15-20 minutes or until the cheese is bubbly and golden brown.
This careful assembly will ensure that each layer melds perfectly during baking, resulting in a lasagna that is both cohesive and rich in flavor.
By following these steps and understanding the components that make up a traditional lasagna, you are well on your way to creating a dish that is not only delicious but also filled with layers of love and flavor. Stay tuned for the next part, where we will delve into additional tips for achieving the perfect lasagna and common questions that may arise during the cooking process.
Layering Strategies for Optimal Flavor Distribution
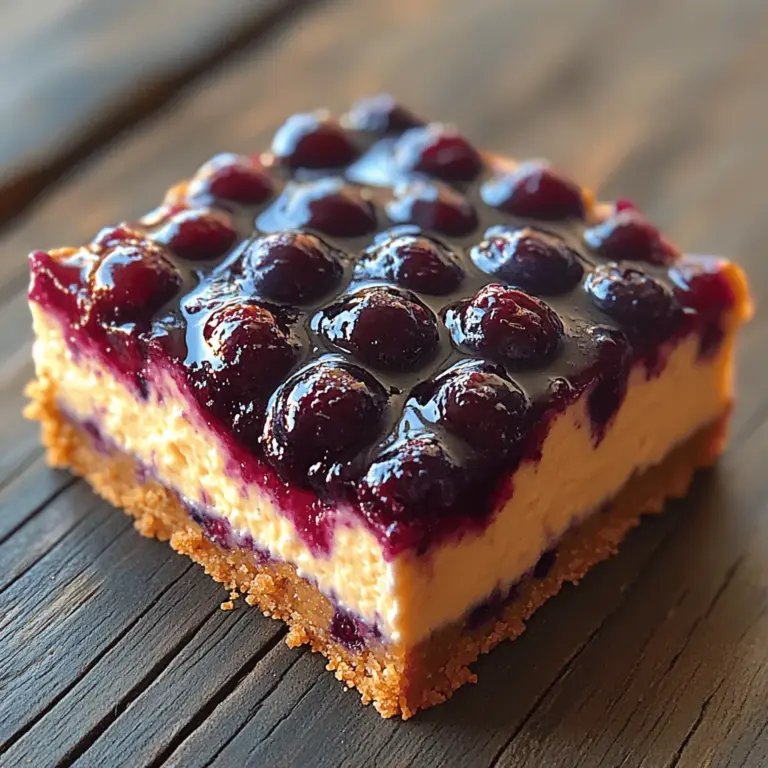
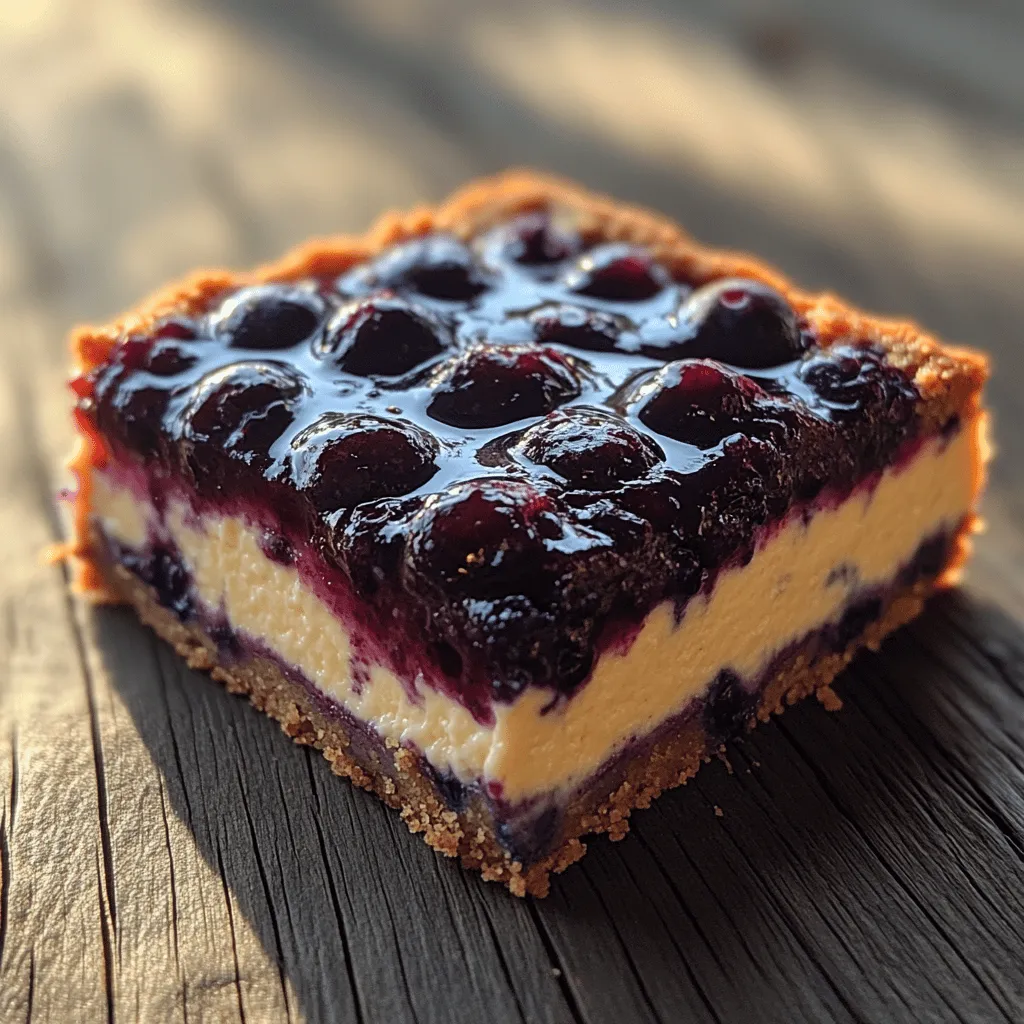
When it comes to crafting the perfect blueberry cheesecake bars, mastering the art of layering is key. Achieving an even distribution of flavors ensures that each bite is a delightful balance of creamy cheesecake and luscious blueberry topping. Start by pouring half of your cheesecake batter into your prepared pan, spreading it evenly with a spatula. Next, add a layer of blueberries atop the cheesecake mixture. This can be done using fresh or frozen blueberries, depending on availability and preference. If using frozen blueberries, allow them to thaw and drain any excess liquid to prevent a watery cheesecake.
After layering the blueberries, gently pour the remaining cheesecake batter over them. Use a knife or skewer to swirl the batter slightly, creating a marbled effect. This technique not only enhances the visual appeal but also integrates the flavors beautifully. For a final touch, sprinkle some additional blueberries on top before baking; they will burst in the oven, adding an extra layer of flavor and a pop of color.
Tips for Preventing Sogginess: The Importance of Draining Ingredients
One common pitfall in cheesecake bars is the dreaded soggy base. This can be particularly problematic if you’re using fresh fruit or certain types of toppings. To prevent this, make sure to drain any ingredients that contain excess moisture. For instance, if you’re using frozen blueberries, allow them to thaw completely and gently pat them dry with a paper towel. This small step can make a significant difference in the final texture of your cheesecake bars.
Additionally, consider using a thicker crust, such as one made from crushed graham crackers mixed with melted butter. This will provide a sturdy base that holds up well against moisture. If you prefer, you can also pre-bake the crust for about 10 minutes before adding the cheesecake layer. This will help create a barrier that further prevents sogginess.
How to Achieve the Perfect Bake: Timing and Temperature
The baking process is crucial in achieving a creamy and smooth cheesecake bar. Preheat your oven to 325°F (163°C) and ensure your oven thermometer is accurate, as an uneven temperature can lead to undesired results. Once your cheesecake bars are in the oven, keep a close eye on them. The ideal baking time is typically around 40-45 minutes, but this may vary depending on your oven and the thickness of the batter.
To check for doneness, gently shake the pan; the edges should be set while the center remains slightly jiggly. A perfectly baked cheesecake will continue to cook slightly after being removed from the oven due to residual heat. Allow your bars to cool in the pan for at least an hour before transferring them to the refrigerator to chill for several hours or overnight. This chilling time is essential for the flavors to meld and the texture to set properly.
The Right Baking Dish
Choosing the correct baking dish is fundamental in ensuring your blueberry cheesecake bars bake evenly. A glass or light-colored metal pan works best for this recipe. Avoid dark pans, as they can absorb heat and cause the edges to cook faster than the center, leading to cracks in your cheesecake. If you’re using a glass baking dish, remember that it will take longer to heat up than metal, so adjust your baking time accordingly.
The size of the dish matters too; a 9×13-inch pan is ideal for this recipe, providing enough space for even layering and cooking. If you want thicker bars, consider using a smaller pan, but be prepared to adjust your baking time.
Baking Techniques
When baking your cheesecake bars, you may wonder whether to cover the dish or leave it uncovered. For blueberry cheesecake bars, it’s generally best to bake them uncovered to allow for proper browning and to avoid condensation collecting on the surface. However, if you notice that the edges are browning too quickly, you can loosely cover the pan with aluminum foil for the last few minutes of baking.
How to Tell When Your Cheesecake is Perfectly Baked
Determining the doneness of your cheesecake bars can be tricky. Look for a slight jiggle in the center; it should not be completely set but should not be overly wobbly either. You can also use a toothpick or a cake tester inserted into the center to check for doneness—if it comes out clean or with a few moist crumbs, your cheesecake is ready. Remember, the bars will continue to set as they cool.
Serving Your Homemade Cheesecake Bars
Presentation Tips
Once your blueberry cheesecake bars are cooled and chilled, it’s time to present them beautifully. Start by using a sharp knife to cut them into clean, even squares. To make cutting easier, warm the knife under hot water and wipe it dry before slicing. This will help prevent the cheesecake from sticking to the knife and keep your edges sharp.
For a stunning presentation, serve the bars on a decorative platter, garnished with fresh blueberries and a dusting of powdered sugar. A sprig of mint can add a pop of color and a touch of elegance.
How to Cut and Serve Without Losing Layers
To serve your cheesecake bars without losing their layers, make sure they are thoroughly chilled before cutting. This will help them hold their shape. Use a straight-down motion with a sharp knife for each cut, rather than sawing back and forth, which can cause the layers to separate. If you find that the bars are sticking to the knife, wipe the blade clean between cuts.
Ideal Accompaniments: Bread, Salad, or Wine
Blueberry cheesecake bars are delightful on their own, but you can elevate the experience by pairing them with complementary flavors. Consider serving them with a light, fluffy whipped cream or a scoop of vanilla ice cream for added richness. If you want to add a touch of sophistication, a drizzle of homemade blueberry sauce or a berry compote can enhance the flavor while also serving as an attractive garnish.
For an ideal accompaniment, consider pairing your dessert with a light salad featuring fresh ingredients and a citrus dressing, or even a crisp glass of dessert wine such as Riesling or Moscato. These options will balance the sweetness of the cheesecake bars beautifully.
Storage and Reheating Tips
How to Store Leftover Cheesecake Bars for Freshness
If you have any leftovers (which is often a rarity), you can store your blueberry cheesecake bars in the refrigerator. To keep them fresh, cover them tightly with plastic wrap or transfer them to an airtight container. They will stay delicious for up to five days. For longer storage, consider freezing them. Wrap each bar individually in plastic wrap and then place them in a freezer-safe container. They can be frozen for up to three months.
Best Methods for Reheating to Maintain Quality
If you decide to reheat your cheesecake bars, it’s best to do so gently to avoid altering the texture. To reheat, place the bars in a preheated oven at 300°F (150°C) for about 10-15 minutes, just until warmed through. Avoid using a microwave, as this can cause the cheesecake to become rubbery and lose its creamy texture.
Exploring Variations of Cheesecake Bars
Vegetarian Cheesecake Bars
Cheesecake bars can be easily adapted for a vegetarian diet by ensuring that all ingredients are free from animal products, such as gelatin. You can enhance the flavor by incorporating other fruits or even spices like cinnamon or vanilla bean into the cheesecake batter. For a twist, consider adding a layer of chocolate ganache or using a different fruit topping like strawberries or raspberries.
Gluten-Free Cheesecake Bars
For those following a gluten-free diet, simply swap out the graham cracker crust for a gluten-free alternative. Many brands offer gluten-free graham crackers, or you can make a crust using almond flour and melted butter. Ensure that all other ingredients, such as baking powder and flavorings, are also gluten-free.
International Cheesecake Variations
Cheesecake is a beloved dessert around the world, and there are numerous international variations to explore. For example, Japanese cheesecake is light and fluffy, resembling a soufflé, while Italian ricotta cheesecake offers a richer flavor profile. You can experiment with unique ingredients like matcha powder, dulce de leche, or even spices like cardamom to create a fusion of flavors in your cheesecake bars.
Conclusion
The joy of creating homemade blueberry cheesecake bars lies not just in the delightful taste, but also in the experience of sharing these treats with loved ones. The process encourages creativity in the kitchen, whether through experimenting with flavors, adjusting ingredients, or discovering new serving suggestions.
As you savor each creamy, fruity bite, let it be a reminder of the happiness that comes from cooking and sharing meals. Embrace the freedom to make the recipe your own, adding personal touches that reflect your unique taste. Each batch you create can become a cherished tradition, bringing friends and family together to enjoy the sweet moments that life has to offer. So, gather your ingredients, and let the baking begin!
