Introduction
Indulging in a warm, buttery scone is one of life’s simple pleasures, especially when it comes to the rich, nutty flavor of almond. These Heavenly Almond Scones are not only easy to prepare but also perfect for breakfast, brunch, or an afternoon treat. With a tender crumb and a delightful crunch from the sliced almonds, this recipe will quickly become a favorite in your household. In this article, we’ll explore the ingredients, instructions, and the delightful history behind scones, ensuring that your baking experience is both enjoyable and rewarding.
The Allure of Scones: A Brief History
Understanding the origins of scones provides a richer context for your baking. The history of scones is as captivating as their taste, woven into the fabric of British culinary tradition.
The English Tradition
Originating in the United Kingdom, scones have a deep-rooted history that dates back to the 16th century. It is believed that they were first made in Scotland, and the name “scone” is thought to be derived from the “Stone of Scone,” where Scottish kings were crowned. Traditionally, scones were made with oats and enjoyed with cream and jam, particularly during tea time. Over the centuries, they evolved into the fluffy, buttery delights we know today, often served with clotted cream and jam during afternoon tea.
Variations Across Cultures
Scones have transcended their English origins, embracing variations across cultures that highlight their versatility. In the United States, for example, scones are often sweeter and may include a variety of mix-ins such as fruits, chocolate, or nuts. In contrast, traditional British scones remain relatively simple, allowing the flavor of the key ingredients to shine through. Countries like Australia and Canada have also put their spin on this classic, incorporating local ingredients and flavors, making scones a truly global treat.
Scones in Modern Cuisine
The resurgence of scones in contemporary kitchens and cafes has led to a renaissance of flavors and pairings. Chefs and home bakers alike are experimenting with combinations that range from savory to sweet, incorporating seasonal fruits, herbs, and spices. This creative approach has revitalized the scone, turning it into a fashionable item on brunch menus and a beloved staple in home baking. With innovative recipes such as savory cheese scones or gluten-free variations, the appeal of scones continues to grow in the culinary world.
Ingredient Breakdown: What Makes These Scones Heavenly?
A comprehensive look at each ingredient and its role in the recipe will help you appreciate the magic behind these Heavenly Almond Scones.
All-Purpose Flour
All-purpose flour forms the backbone of the scone recipe, providing the necessary structure and texture. It offers a balanced protein content that allows the scones to rise while still maintaining a tender crumb. When measuring, it’s essential to spoon the flour into your measuring cup and level it off to avoid packing it down, which can lead to dense scones.
Almond Flour
Almond flour is a star ingredient in this recipe, enhancing the flavor profile and adding moisture to the dough. Its nutty taste complements the sliced almonds, creating a harmonious blend of flavors. Additionally, almond flour contributes to a slightly denser texture, making the scones rich and satisfying.
Sugar
Sugar plays multiple roles in the scone-making process. It balances the sweetness of the scones, contributing to the overall flavor while aiding in browning during baking. For this recipe, granulated sugar is typically used, but you can experiment with alternatives like brown sugar for a deeper caramel flavor.
Baking Powder
Baking powder serves as the leavening agent, essential for helping the scones rise and achieve that light, airy texture. It’s crucial to use fresh baking powder for optimal results; expired baking powder can lead to flat scones. Ensure you store your baking powder in a cool, dry place to maintain its potency.
Butter
Butter is the key to achieving a rich, flaky texture in your scones. By cutting cold butter into the dry ingredients, you create small pockets of fat that melt during baking, resulting in a tender crumb. For the best results, use unsalted butter so you can control the salt content of your scones. The butter should be cold and cut into small cubes before incorporation into the flour mixture.
Eggs and Cream
Eggs and cream are vital binding agents that enrich the dough. Eggs contribute to the structure and moisture, while cream adds richness and flavor. Heavy cream is often used for its higher fat content, which leads to a more decadent scone. If you prefer a lighter version, you can substitute half-and-half or milk.
Almonds and Optional Ingredients
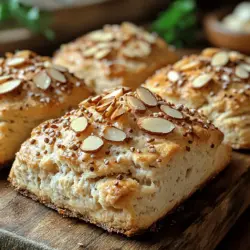
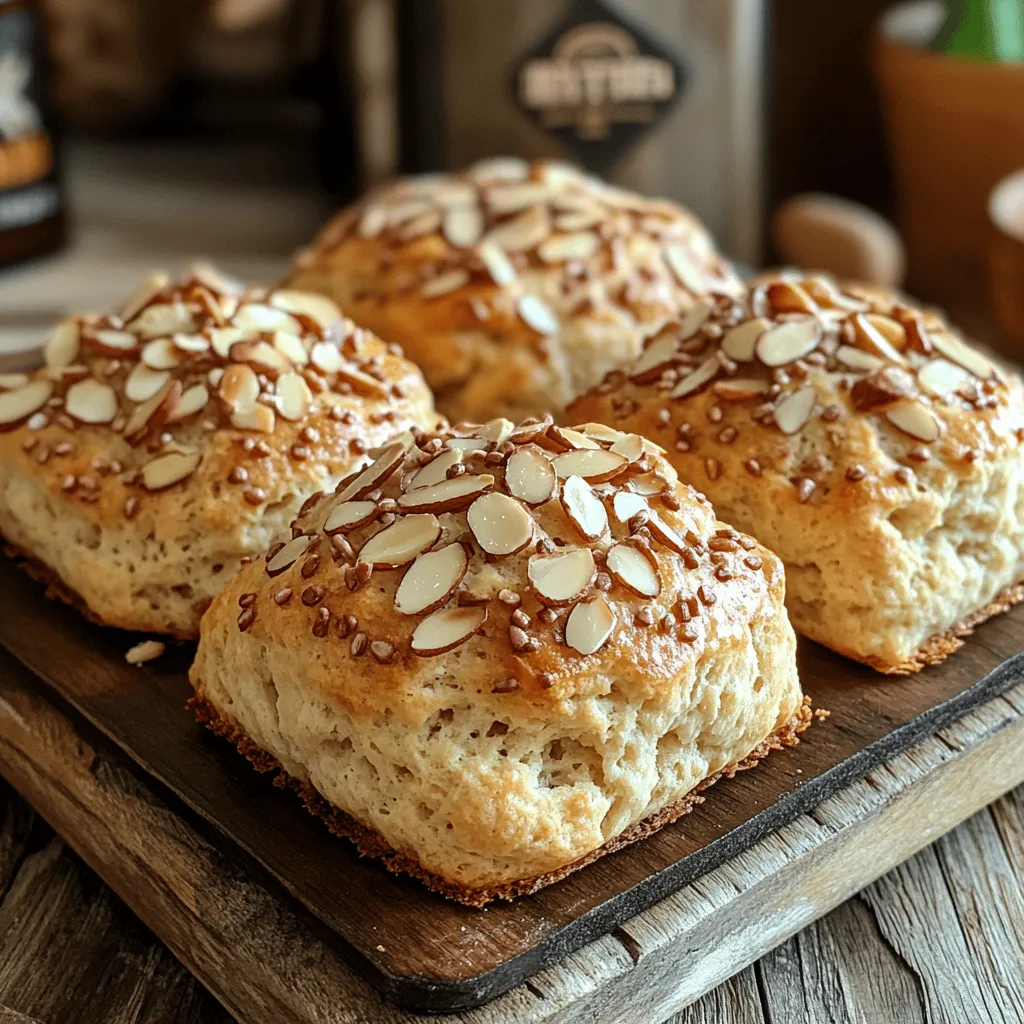
Sliced almonds are the finishing touch that adds both flavor and texture to the scones. They provide a delightful crunch and enhance the overall almond flavor profile. You may also choose to incorporate optional ingredients such as almond extract for an even more pronounced almond flavor or a sprinkle of coarse sugar on top before baking for a sweet, crunchy crust.
Step-by-Step Guide to Making Heavenly Almond Scones
Now that we’ve explored the ingredients, let’s dive into the step-by-step process of making these Heavenly Almond Scones. A clear, detailed walkthrough will ensure clarity and ease of preparation, making your baking experience enjoyable.
Prepping Your Workspace
Before you start baking, it’s essential to prep your workspace. Gather all the necessary tools and ingredients to streamline the process. You’ll need:
– A mixing bowl
– A whisk for combining dry ingredients
– A pastry cutter or two forks for cutting in the butter
– A baking sheet
– Parchment paper (optional, for easy cleanup)
– A rolling pin
– A sharp knife or pizza cutter for cutting the scones
Once you have everything in place, preheat your oven to 400°F (200°C) to ensure it’s hot and ready when your scone dough is formed.
Mixing Dry Ingredients
Begin by measuring out the all-purpose flour and almond flour into a large mixing bowl. Use a whisk to combine the two flours thoroughly, ensuring an even distribution. Next, add the sugar and baking powder, whisking again to incorporate all the dry ingredients. This step is crucial as it helps to aerate the mixture, leading to lighter scones.
Once the dry ingredients are well mixed, it’s time to cut in the cold butter. Using a pastry cutter or two forks, work the butter into the flour mixture until it resembles coarse crumbs. The goal is to have small, pea-sized pieces of butter throughout the flour, which will create the tender, flaky texture we desire in our scones.
Continue with the next steps to bring your Heavenly Almond Scones to life, ensuring every detail is followed for optimal results.
Cutting in the Butter: Techniques for Achieving the Perfect Crumb
One of the most crucial steps in making Heavenly Almond Scones is cutting in the butter, which contributes to the scone’s flaky texture. The goal is to create small, pea-sized pieces of butter distributed throughout the dry ingredients. Here are a few effective techniques to achieve this:
1. Using a Pastry Cutter: This is a classic method. A pastry cutter has multiple blades that can quickly break the butter into small pieces as you press down. Make sure your butter is cold, as this keeps the scones light and airy.
2. Fork Method: If you don’t have a pastry cutter, you can use a fork. Simply press the butter into the flour mixture until it resembles coarse crumbs. This method may take a little longer but is effective.
3. Food Processor: For a quick and efficient approach, you can pulse the butter and dry ingredients in a food processor. Make sure to stop as soon as the mixture resembles coarse crumbs to avoid over-processing.
4. Hands-On Approach: If you prefer a tactile method, you can use your fingers to rub the butter into the flour mixture. This is often referred to as the “rubbing in” method and should be done quickly to prevent the butter from melting.
Combining Wet and Dry Ingredients: Tips for Avoiding Overmixing
Once the butter is incorporated into the dry ingredients, it’s time to combine the wet and dry mixtures. This stage is critical because overmixing can lead to tough scones. Here’s how to do it correctly:
1. Make a Well: In your dry mixture, create a well in the center before adding the wet ingredients. This allows the liquid to be absorbed evenly without overmixing the dry ingredients.
2. Gentle Folding: When adding the wet ingredients (milk and eggs), use a spatula or wooden spoon to gently fold them into the dry ingredients. Mix just until combined; a few lumps are okay.
3. Limit Handling: Try to handle the dough as little as possible. The more you work the dough, the more gluten develops, resulting in denser scones.
4. Watch for Dry Pockets: If you see dry flour pockets, use a light touch to incorporate them. Avoid vigorous stirring, which can lead to tough scones.
Shaping the Dough: Methods for Cutting and Forming the Scones
Once your dough is mixed, it’s time to shape your scones. This step will influence the final presentation and texture:
1. Floured Surface: Turn your dough out onto a lightly floured countertop. Gently pat it down into a rectangle about 1-inch thick.
2. Cutting Options: You can cut the scones into traditional wedge shapes or use a round biscuit cutter for a classic presentation. For wedges, cut the rectangle into triangles. For rounds, press down firmly with the cutter and twist slightly to ensure a clean cut.
3. Re-rolling Scraps: If you have leftover dough after cutting, gather the scraps, knead gently, and re-roll to cut more scones. But be cautious—overworking the dough can lead to tougher scones.
4. Chilling: For best results, place the shaped scones on a baking sheet lined with parchment paper and refrigerate them for about 30 minutes before baking. This step helps maintain their shape and enhances the flakiness.
Baking to Perfection: Timing and Temperature for Optimal Results
Baking is where the magic happens. Proper timing and temperature are essential for achieving perfectly baked scones:
1. Oven Temperature: Preheat your oven to 400°F (200°C). This high temperature helps the scones rise quickly, creating that desirable flaky texture.
2. Baking Time: Bake the scones for approximately 15 to 20 minutes, or until they are golden brown on top. Keep an eye on them, as oven temperatures can vary.
3. Doneness Check: A good way to check if your scones are done is to tap the bottom; it should sound hollow. Alternatively, a toothpick inserted should come out clean.
4. Cooling: Once baked, remove the scones from the oven and let them cool on a wire rack. This will prevent them from becoming soggy on the bottom.
Cooling and Serving Suggestions: Best Practices for Presentation and Enjoyment
Once your Heavenly Almond Scones are baked and cooled, it’s time to serve them. Here are some tips for the best presentation and enjoyment:
1. Presentation: Arrange your scones on a beautiful platter or a tiered cake stand for an elegant touch. Dust lightly with powdered sugar for a refined finish.
2. Serving Temperature: Scones are best enjoyed warm or at room temperature. If they lose their warmth, you can reheat them in the oven for a few minutes before serving.
3. Pairing Suggestions: Offer a selection of spreads such as clotted cream, almond butter, or fruit preserves. These will enhance the almond flavor and create a delightful contrast.
4. Enjoy with Beverages: Pair your scones with a pot of freshly brewed tea or a cup of coffee. The rich flavors of the beverages will complement the nutty notes of the scones beautifully.
Flavor Enhancements: Customizing Your Scones
One of the joys of baking is the ability to customize recipes. Here are some flavor enhancements you can consider for your Heavenly Almond Scones:
– Almond Extract: For a more intense almond flavor, add a teaspoon of almond extract to the wet ingredients. This will amplify the nutty essence and create a richer taste.
– Chocolate and Dried Fruits: For added depth, consider folding in mini chocolate chips or dried fruits like cranberries or apricots into the dough. These additions provide bursts of flavor and texture.
– Seasonal Variations: Adapt the recipe for holidays or special occasions by incorporating seasonal spices or ingredients. For instance, adding pumpkin spice during fall or orange zest for a refreshing twist in the summer can elevate your scone game.
Pairing Suggestions: What to Serve with Your Scones
To enhance the enjoyment of your Heavenly Almond Scones, consider these complementary flavors and pairings:
– Spreads: Traditional accompaniments like butter are always a hit, but you can elevate the experience with flavored butters, homemade jams, honey, or whipped cream. Almond butter pairs particularly well for an extra almond touch.
– Beverages: Scones are a classic tea time treat. Pair them with Earl Grey, chamomile, or a robust English breakfast tea. If coffee is your preference, a smooth latte or cappuccino complements the scones marvelously.
– Presentation Ideas: To create a memorable experience, serve your scones on a rustic wooden board or a vintage plate. Garnish with fresh fruits or edible flowers for an aesthetically pleasing display.
The Nutritional Perspective: Scones in a Balanced Diet
Understanding how Heavenly Almond Scones fit into a balanced diet is essential for enjoying them guilt-free:
– Nutritional Breakdown: Each scone typically contains around 200-250 calories, depending on the recipe variations. With a balance of carbs, fats, and protein, these scones can serve as a satisfying treat.
– Moderation and Enjoyment: It’s important to savor these delightful treats mindfully. Enjoying a scone with a cup of tea or coffee can be a wonderful way to incorporate moderation into your diet while indulging in a delicious flavor experience.
– Healthier Alternatives: If you’re looking to lighten your scones, consider substituting half of the all-purpose flour with whole wheat flour or using Greek yogurt instead of heavy cream. These adjustments can enhance the nutritional profile without compromising on taste.
Conclusion
Heavenly Almond Scones are more than just a delightful baked treat; they are a culinary experience that brings comfort and joy. With a perfect blend of flavors and textures, these scones can easily be adapted to suit any palate. Whether enjoyed fresh out of the oven or as part of a leisurely brunch spread, they will impress family and friends alike. By following this comprehensive guide, you’ll not only master the art of scone-making but also create lasting memories around the table. Enjoy the process, savor the results, and let these Heavenly Almond Scones become a cherished addition to your baking repertoire.