Crunchy Peanut Butter Bliss Bars: A Delicious No-Bake Snack
In recent years, no-bake bars have surged in popularity among health-conscious snackers, and for good reason. These easy-to-make treats offer a perfect balance of taste and nutrition, making them an ideal option for busy lifestyles. Among the myriad of no-bake recipes available, Crunchy Peanut Butter Bliss Bars stand out as a delectable choice that satisfies your sweet tooth while providing a healthy dose of energy.
These bliss bars combine the rich, creamy flavor of peanut butter with the wholesome goodness of oats and a hint of sweetness from natural sweeteners, creating a snack that is as nourishing as it is indulgent. Whether you’re looking for a quick breakfast on the go, a post-workout refuel, or a satisfying dessert to share with friends, these bars are sure to become a staple in your kitchen.
One of the best aspects of Crunchy Peanut Butter Bliss Bars is their versatility. The recipe can easily be modified to suit different dietary preferences and tastes, allowing you to customize the ingredients to make them your own. From choosing between creamy and crunchy peanut butter to experimenting with various sweeteners and add-ins, the possibilities are endless.
Key Ingredients
At the heart of this recipe are three primary ingredients: peanut butter, oats, and honey or maple syrup. Each component plays a vital role in contributing to the bars’ flavor, texture, and nutritional profile. Let’s take a closer look at these ingredients and what makes them special.
1. Peanut Butter: A Nutritional Powerhouse
Peanut butter is not just a delicious spread; it’s a nutritional powerhouse packed with protein and healthy fats. A two-tablespoon serving typically contains about 7 grams of protein and 16 grams of fat, with the majority being heart-healthy monounsaturated fats. This makes peanut butter an excellent choice for anyone looking to increase their protein intake while enjoying a satisfying snack.
When it comes to selecting your peanut butter, you have options. Creamy peanut butter offers a smooth texture that blends well into recipes, while crunchy peanut butter adds a delightful crunch that enhances both flavor and mouthfeel. Depending on your preference, either variety can be used in the Crunchy Peanut Butter Bliss Bars, allowing you to tailor the texture to your liking.
2. Natural Sweeteners: Honey vs. Maple Syrup
The sweetness of these bliss bars comes from natural sweeteners like honey or maple syrup. Both options are healthier alternatives to refined sugars, offering their own unique flavors and health benefits. Honey is known for its antioxidant properties and can provide a quick energy boost, while maple syrup is a great source of minerals like manganese and zinc.
If you’re following a vegan diet or simply prefer a plant-based option, maple syrup is an excellent substitute for honey. Its rich, caramel-like flavor complements the peanut butter beautifully, making it a favorite among many home bakers. When choosing your sweetener, consider your taste preferences and any dietary restrictions to find the perfect fit for your bliss bars.
3. The Role of Oats in the Recipe
Rolled oats are another key ingredient in Crunchy Peanut Butter Bliss Bars. These whole grains are not only versatile but also packed with health benefits. Oats are a great source of dietary fiber, which aids in digestion and helps to keep you feeling full longer. They are also linked to heart health, as they can help lower cholesterol levels when consumed regularly.
For those with gluten sensitivities, gluten-free rolled oats are readily available and can be used without compromising on taste or texture. This makes the bars accessible to a wider audience, ensuring that everyone can enjoy them without worry.
4. Crispy Rice Cereal: Crunch and Texture
To add an extra layer of crunch and texture, crispy rice cereal is incorporated into the recipe. This ingredient not only enhances the overall mouthfeel of the bars but also provides a lightness that balances the denser components like peanut butter and oats. For those seeking gluten-free options, there are several brands of crispy rice cereal that cater to this dietary need, ensuring that everyone can indulge in these treats.
5. Optional Ingredients: Personal Touch
One of the joys of making Crunchy Peanut Butter Bliss Bars is the opportunity to personalize them. Consider adding chocolate chips, nuts, or dried fruits to the mix for an extra burst of flavor and texture. Dark chocolate chips can add a rich sweetness that pairs perfectly with the nutty flavors, while chopped nuts can enhance the crunch factor and provide additional healthy fats.
For those looking to boost the nutritional content, consider mixing in seeds like chia or flaxseed, or even a scoop of protein powder. The beauty of this recipe lies in its flexibility, allowing you to cater to your personal tastes and nutritional needs.
Step-by-Step Instructions
Before diving into the preparation of your Crunchy Peanut Butter Bliss Bars, it is essential to get your workspace organized. One of the first steps in creating these bars is preparing your baking dish.
Preparation of Your Pan
Properly lining your baking dish is crucial for ensuring that your bliss bars come out easily once they’ve set. A well-lined pan makes for easy removal and clean-up, allowing you to enjoy your treats without the hassle of scraping them out of the dish.
To line your baking dish, use parchment paper, making sure to leave some overhang on the sides. This will create convenient “handles” for lifting the bars out once they’re ready. If you prefer a non-stick cooking spray, you can lightly coat the bottom and sides of the dish before placing the parchment paper. This extra step can prevent any sticking and ensure that your bars maintain their shape.
Mixing the Wet Ingredients
Once your pan is prepared, it’s time to mix the wet ingredients. Begin by measuring out your peanut butter and sweetener of choice—honey or maple syrup. If you’re using crunchy peanut butter, be sure to stir it well to achieve a uniform consistency.
In a bowl, combine the peanut butter and sweetener, mixing them together until they form a smooth, cohesive mixture. You can use a spatula or a wooden spoon for this step. If you find the mixture to be too thick, consider gently warming it in the microwave for a few seconds to make it easier to blend.
After achieving a smooth consistency, you can then incorporate any optional ingredients, such as vanilla extract or a pinch of salt, to enhance the flavor profile of your bliss bars. The combination of these ingredients will create a rich and flavorful base for your bars, setting the stage for the addition of the dry ingredients that will follow.
With these foundational steps complete, you are well on your way to crafting your very own Crunchy Peanut Butter Bliss Bars. Stay tuned for the next part of this article, where we will delve into the mixing of dry ingredients, the final assembly of the bars, and tips for storing and enjoying your delicious creations.
Detailed Instructions for Heating and Mixing the Peanut Butter and Sweetener
To kick off the creation of your Crunchy Peanut Butter Bliss Bars, it’s essential to prepare the wet mixture correctly. Begin by measuring out 1 cup of creamy peanut butter (or crunchy, if you prefer an extra texture) and ½ cup of honey or maple syrup—both serve as the sweet base of your bars.
In a medium saucepan, combine the peanut butter and chosen sweetener over low to medium heat. Stir continuously to prevent burning and ensure an even mixture. Heat until the peanut butter is completely melted and the mixture is smooth, typically about 3 to 5 minutes. If using maple syrup, remember that it incorporates more quickly than honey, so keep an eye on it to avoid overheating.
Tips for Achieving a Smooth Consistency
– Use a Non-Stick Pan: This will help prevent the mixture from sticking, making it much easier to combine.
– Stir Constantly: Continuous stirring helps to create a uniform texture and prevents the mix from scorching.
– Temperature Control: Avoid high heat, which can cause the peanut butter to separate or become too thick.
Combining Dry Ingredients
Once your wet mixture is smooth, it’s time to address the dry ingredients. In a large mixing bowl, combine 2 cups of rolled oats, ½ cup of protein powder (optional for added nutrition), and a pinch of salt.
Importance of Even Mixing in Dry Ingredients
Mixing your dry ingredients thoroughly is crucial for achieving consistent flavor and texture throughout the bars. Use a whisk or fork to break up any clumps, ensuring that the oats and protein powder are evenly distributed.
Suggestions for Additional Mix-Ins
To add a personal touch and enhance the nutritional profile of your bliss bars, consider incorporating mix-ins. Here are some delicious options:
– Seeds: Chia seeds, flaxseeds, or sunflower seeds add texture and healthy fats.
– Dried Fruits: Raisins, cranberries, or chopped dates provide natural sweetness and chewiness.
– Nuts: Chopped almonds or walnuts can introduce a crunch that complements the creamy peanut butter.
Bringing It All Together
Now that both your wet and dry ingredients are ready, it’s time to combine them. Pour the warm peanut butter and sweetener mixture over the dry ingredients in the mixing bowl. Use a spatula to gently fold the mixture until all dry ingredients are completely coated.
Techniques for Ensuring the Mixture Thoroughly Coats the Dry Ingredients
– Fold, Don’t Stir: Be gentle to prevent breaking down the oats. Folding helps maintain the structure of the bars.
– Use Your Hands: Once the spatula is no longer effective, it can be helpful to use your hands to mix everything together. Just be careful as the mixture may be warm.
Importance of Pressing the Mixture Firmly into the Pan
After combining, transfer the mixture into a lined 9×9-inch baking pan. It’s vital to press the mixture firmly and evenly into the pan. Use a flat-bottomed measuring cup or your hands to pack it down tightly; this helps the bars hold their shape after cutting and prevents them from crumbling.
Adding the Chocolate Drizzle (Optional)
If you want to elevate your Crunchy Peanut Butter Bliss Bars, consider adding a chocolate drizzle. Begin by melting about ½ cup of dark chocolate chips in a microwave-safe bowl. Heat in 30-second intervals, stirring in between until the chocolate is smooth and melted.
Instructions for Melting Chocolate
1. Place chocolate chips in the bowl and microwave on high for 30 seconds.
2. Stir the chocolate; if not fully melted, return to the microwave for another 30 seconds.
3. Once melted, let it cool slightly before drizzling over your pressed mixture.
Discussing the Balance of Flavors
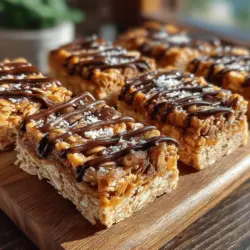
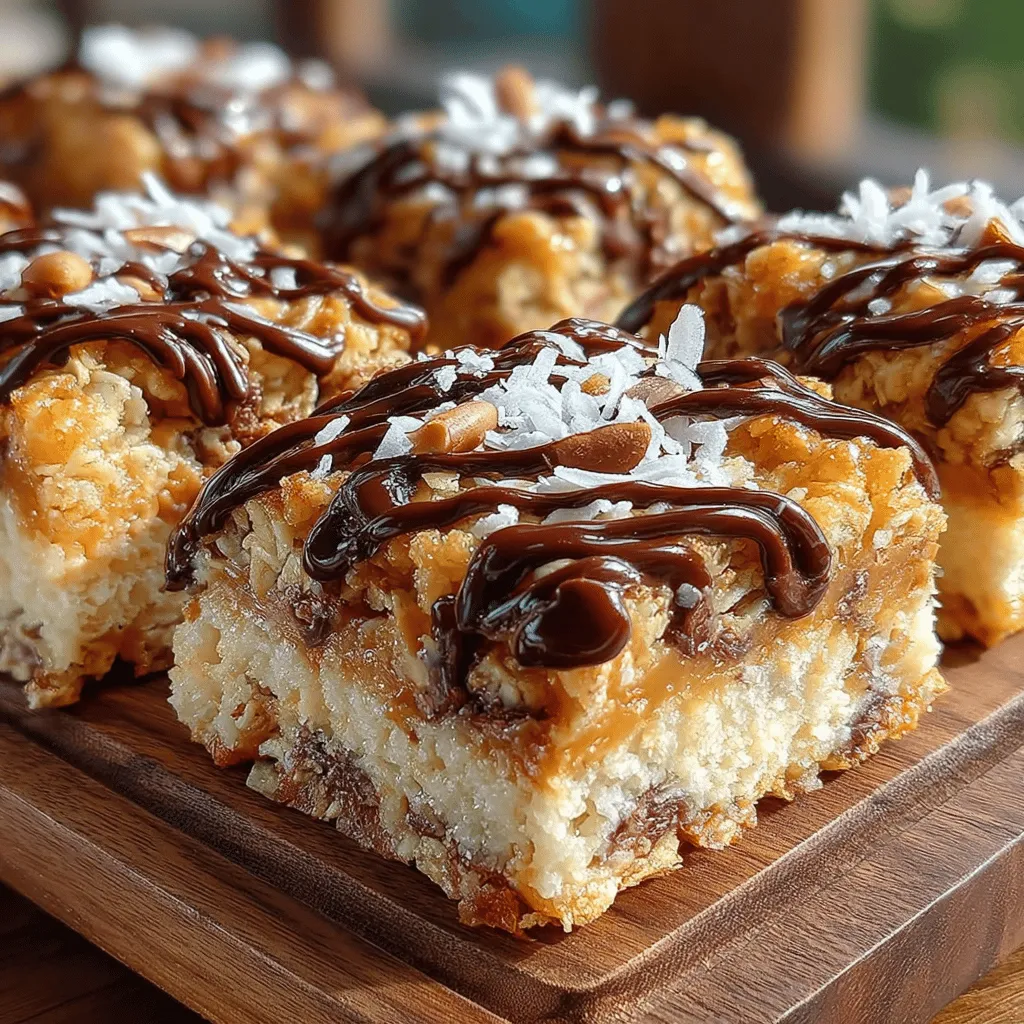
The rich, slightly bitter taste of dark chocolate beautifully contrasts with the sweetness of the peanut butter and honey, creating a well-rounded flavor profile. Drizzle the melted chocolate over the bars in a zigzag motion for a decorative touch.
Chilling and Setting
After you’ve added the chocolate drizzle, it’s crucial to let the bars chill. Place the pan in the refrigerator for at least 2 hours to allow the bars to set properly. This step is essential for achieving the right texture—firm enough to hold together but soft enough to enjoy a chewy bite.
Recommendations for Storage and Shelf Life
Once set, remove the bars from the pan using the parchment paper for easier slicing. Store them in an airtight container in the refrigerator where they can last for up to two weeks. For longer storage, consider freezing them; they freeze well for up to three months. Simply wrap individual bars in plastic wrap and place them in a freezer-safe bag.
Cutting and Serving
When ready to serve, use a sharp knife to cut the bars into squares or rectangles, depending on your preferred size.
Tips for Cutting Bars Evenly
– Chill Before Cutting: Ensure the bars are completely chilled to help maintain their shape while cutting.
– Use a Warm Knife: Dip your knife in hot water and wipe it dry before cutting; this can help achieve cleaner edges.
Suggestions for Serving and Enjoying the Bars
These bliss bars are perfect for a quick snack on the go, a post-workout treat, or even a healthier dessert option. Consider pairing them with a glass of almond milk or enjoying them alongside fresh fruit for a balanced snack.
Nutritional Information
Each serving of Crunchy Peanut Butter Bliss Bars (one bar, approximately 1.5 inches by 3 inches) contains roughly:
– Calories: 180
– Protein: 5g
– Fat: 9g (mostly healthy fats from the peanut butter)
– Carbohydrates: 22g
– Fiber: 3g
These bars are not only satisfying but also provide a good source of energy, making them an excellent choice for a pre- or post-workout snack. The combination of protein, healthy fats, and fiber helps keep you feeling full longer.
Why Crunchy Peanut Butter Bliss Bars Are a Great Choice
Making these bars at home is incredibly convenient. You can whip up a batch in under an hour, and they require no baking, making them an ideal recipe for anyone, regardless of cooking skills.
Cost-Effectiveness Compared to Store-Bought Snacks
Homemade Crunchy Peanut Butter Bliss Bars are also cost-effective compared to their store-bought counterparts. Many commercial snack bars are laden with preservatives and artificial ingredients, while you can control the quality and source of every ingredient in your homemade version.
Satisfaction of Creating a Healthy Treat from Scratch
There’s something uniquely rewarding about creating your snacks from scratch. Not only do they taste better, but you also have the peace of mind that comes from knowing exactly what is in your food.
Conclusion
Crunchy Peanut Butter Bliss Bars are versatile, nutritious, and incredibly simple to make. Whether you enjoy them as a snack, dessert, or energy booster, these bars are a delightful addition to any healthy eating plan.
Feel free to experiment with the recipe by adding your favorite mix-ins or adjusting the sweetness to your liking. Enjoy the satisfaction of creating a wholesome, homemade treat that not only satisfies your cravings but also nourishes your body. So gather your ingredients and start crafting your very own batch of bliss bars today!