Introduction
The culinary landscape has undeniably embraced baked feta cheese, a dish that has captivated taste buds around the globe. This crispy baked feta crust recipe transforms the creamy, tangy essence of feta into a delightful bite, encased in a crunchy, golden crust. Perfect as an appetizer for gatherings or a savory snack for an intimate evening at home, this dish is not only simple to prepare but also bursting with flavor that appeals to cheese lovers and casual eaters alike. In this article, we will guide you through the process of creating crispy baked feta crust cubes, breaking down the necessary ingredients and offering serving suggestions that will elevate your dining experience.
The Magic of Feta Cheese
Feta cheese, with its rich history and distinctive flavor, is a staple in Mediterranean cuisine. Originating from Greece, this crumbly cheese has become a beloved ingredient in various dishes worldwide. Traditionally made from sheep’s milk or a blend of sheep and goat’s milk, feta cheese is known for its tangy, salty flavor and creamy texture. Its versatility allows it to be used in salads, pastries, and, of course, this delectable baked recipe.
There are several varieties of feta cheese, each contributing its unique characteristics to dishes. Greek feta, known for its robust flavor and crumbly texture, is often favored for its authenticity. Bulgarian feta, on the other hand, tends to be creamier and less salty, making it a delightful alternative. Understanding these nuances can help you choose the right feta for your crispy baked feta crust cubes, ensuring the best flavor and texture.
The flavor profile of feta cheese is truly one of a kind. With notes of tanginess and a hint of nuttiness, it can enhance a variety of dishes. In comparison to other cheeses, feta’s lower fat content and crumbly texture make it an excellent choice for those seeking a lighter yet flavorful option. When baked, feta transforms into an even more delightful treat, offering a creamy center that contrasts beautifully with a crispy exterior.
Key Ingredients for Crispy Baked Feta Crust
To create the perfect crispy baked feta crust, the quality and selection of your ingredients play a crucial role. The star of the show is, of course, feta cheese. When choosing feta, you may come across different varieties, such as Greek or Bulgarian. Greek feta is generally more popular for its strong flavor, while Bulgarian feta provides a creamier texture that can enhance the dish’s overall mouthfeel. Selecting a high-quality feta cheese is essential, as it directly influences the final outcome of your recipe.
Next, we have the all-important panko breadcrumbs. These Japanese-style breadcrumbs are coarser than traditional breadcrumbs, providing a light and airy texture that achieves the desired crunch when baked. Panko breadcrumbs are the secret ingredient that ensures your baked feta cubes have that irresistible crispy crust.
In addition to feta and panko, grated Parmesan cheese plays a vital role in this recipe, adding depth of flavor and a savory note that complements the feta perfectly. The combination of these cheeses creates a rich and satisfying taste that lingers on the palate.
Seasoning is another critical aspect of the crispy baked feta crust. A drizzle of olive oil not only helps to bind the breadcrumbs but also infuses the dish with a rich, fruity flavor. Dried oregano and garlic powder are essential for elevating the taste profile, adding aromatic notes that enhance the overall flavor experience. For those who enjoy a bit of heat, consider sprinkling in red pepper flakes for a spicy kick that contrasts beautifully with the creaminess of the feta.
Finally, fresh herbs and a squeeze of lemon can brighten the dish and add an appealing visual element. Freshly chopped parsley or basil not only enhances the flavor but also adds a pop of color to your crispy baked feta cubes, making them as visually appealing as they are delicious.
Step-by-Step Guide to Making Crispy Baked Feta Crust Cubes
Now that we’ve covered the ingredients, let’s move on to the essential steps for preparing your crispy baked feta crust cubes. The first step is preheating your oven. Setting the stage for perfect baking is crucial; a preheated oven ensures that your feta will cook evenly, resulting in a beautifully golden crust. Preheat your oven to 400°F (200°C) to create the ideal environment for baking.
Next, prepare the feta cheese. For optimal results, it’s important to ensure that the feta is at the right texture. If your feta is packed in brine, drain it thoroughly to avoid excess moisture that could hinder the crust formation. Pat the cheese dry with paper towels to remove any remaining moisture. Once your feta is ready, cut it into cubes, ensuring they are of uniform size for even cooking.
The next step involves creating the crust mixture. In a mixing bowl, combine panko breadcrumbs, grated Parmesan cheese, dried oregano, and garlic powder. This mixture will provide the crunchy coating that takes your feta cubes to the next level. Drizzle in olive oil to help bind the ingredients together, ensuring an even coating when you apply the crust to the feta.
With your crust mixture prepared, it’s time to assemble your crispy baked feta crust cubes. Take each feta cube and press it gently into the breadcrumb mixture, ensuring an even coating on all sides. This step is crucial in achieving that delightful crunch when baked. Place the coated feta cubes on a parchment-lined baking sheet, leaving enough space between each cube for air circulation.
Now that everything is in place, it’s time to bake your crispy baked feta crust cubes. Slide the baking sheet into the preheated oven and let them bake until the crust is golden brown and crispy, typically around 20-25 minutes. The aroma that fills your kitchen during this process is just a preview of the deliciousness to come.
Stay tuned as we continue with serving suggestions and variations to make your crispy baked feta crust cubes even more delightful.
Coating the Feta: Achieving the Perfect Thickness
To achieve the perfect crispy coating for your baked feta crust cubes, it’s essential to focus on the thickness of the coating. A well-balanced layer will ensure that the feta remains soft and creamy on the inside while achieving that coveted crunch on the outside.
1. Select the Right Feta: Choose a block of high-quality feta cheese for optimal results. Look for feta packed in brine, as this tends to be creamier and richer in flavor.
2. Prepare the Coating Mixture: A simple coating of breadcrumbs mixed with grated Parmesan cheese, garlic powder, and your choice of dried herbs (such as oregano or thyme) works wonders. This mixture should be enough to cover the feta cubes without overwhelming them.
3. Coating Technique:
– First, pat the feta cubes dry with a paper towel to remove excess moisture. This step is crucial, as it helps the coating adhere better.
– Next, dip each cube into a beaten egg, ensuring it’s fully coated.
– Finally, roll the feta cube in the breadcrumb mixture, pressing gently to achieve a thick, even layer. Aim for about a quarter-inch coating to balance texture and flavor effectively.
4. Chill Before Baking: Once coated, placing the feta cubes in the refrigerator for about 30 minutes allows the coating to set. This step is essential for ensuring the crust remains intact during baking, resulting in a perfect crispiness.
Baking Instructions: Timing and Temperature for Optimal Crispiness
Baking your coated feta cubes correctly is key to achieving that desirable crunchy exterior. Follow these steps to ensure perfect baking:
1. Preheat Your Oven: Set your oven to 400°F (200°C). This temperature allows the breadcrumbs to crisp up beautifully without burning.
2. Arrange on a Baking Sheet: Line a baking sheet with parchment paper for easy cleanup and to prevent sticking. Place the chilled feta cubes on the sheet, making sure they are spaced out. This spacing ensures that hot air circulates around each cube, promoting even cooking.
3. Baking Time: Bake the feta cubes for 20-25 minutes, or until they are golden brown and crispy. Keep an eye on them towards the end of the baking time to prevent over-browning. If you notice them browning too quickly, you can lower the oven temperature slightly.
4. Broil for Extra Crispiness: For an extra layer of crunch, consider broiling the feta for the last 2-3 minutes of baking. Keep the oven door slightly ajar to monitor them closely, as they can quickly transition from perfectly crispy to burnt.
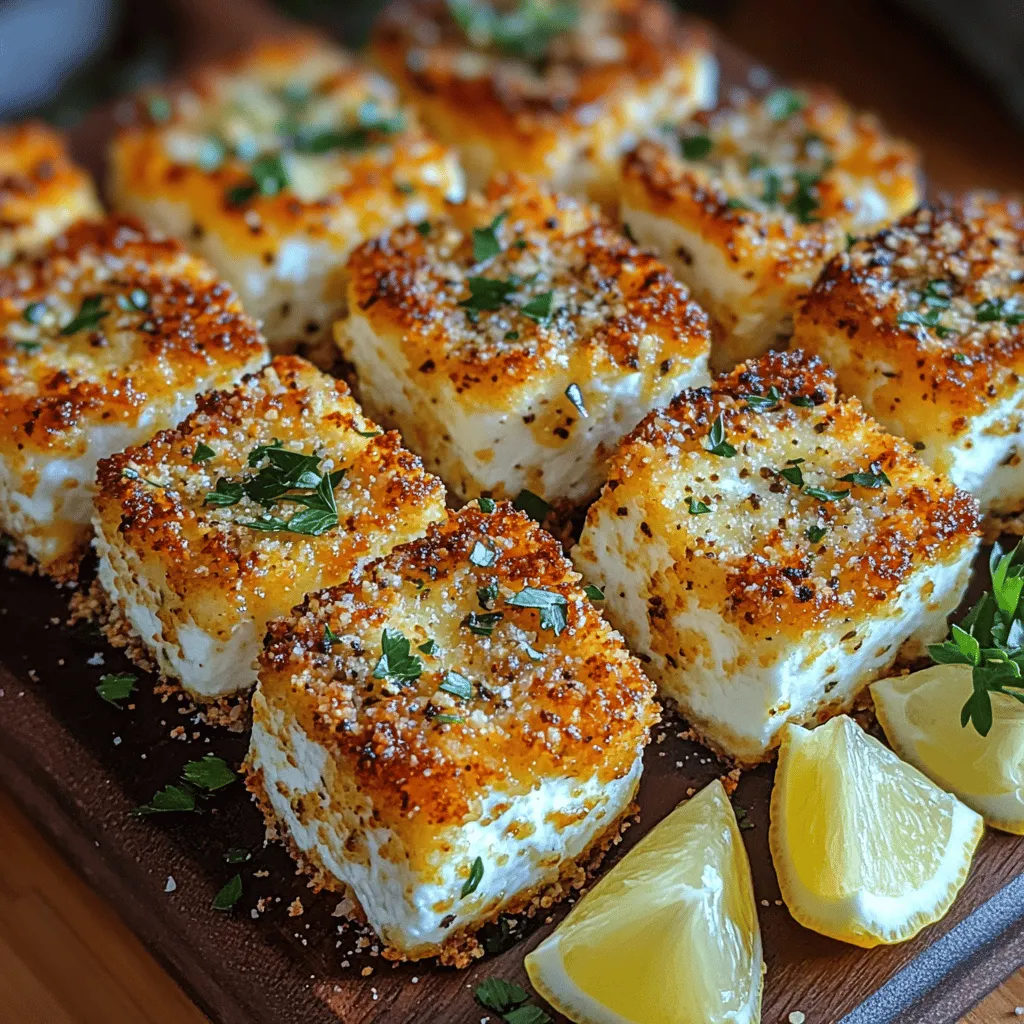
Cooling and Serving: Presentation Tips for a Stunning Dish
Once your crispy baked feta cubes are out of the oven, allow them to cool slightly on the baking sheet for about 5 minutes. This step helps them firm up and makes them easier to handle.
Presentation Tips:
– Serving Platter: Arrange the feta cubes on a large serving platter with a sprinkle of fresh herbs like parsley or dill for a pop of color.
– Garnish: Drizzle with a balsamic reduction or a light olive oil drizzle to enhance the appearance and add a flavor boost.
– Accompaniments: Create an inviting display by incorporating dipping sauces and sides around the feta cubes.
Serving Suggestions for Baked Feta Crust Cubes
The versatility of baked feta makes it a delightful addition to any meal or gathering. Here are some serving suggestions to elevate your dish:
Pairing with Dipping Options: Recommended Accompaniments
1. Hummus: A classic pairing, hummus adds a creamy texture that complements the crunch of the feta. Consider flavors like roasted red pepper or garlic for added depth.
2. Tzatziki: This refreshing yogurt-based sauce with cucumber and dill provides a cool contrast to the warm, crispy feta.
3. Salsa: A fresh tomato salsa or a spicy mango salsa can bring a burst of flavor and a hint of sweetness to your dish.
Best Breads for Serving: Crusty vs. Soft Options
1. Crusty Breads: Offer a selection of crusty breads such as baguette slices or ciabatta. Their hearty texture makes them perfect for scooping up the feta and dipping sauces.
2. Soft Breads: For a different experience, include soft pita or naan bread, which can be torn and used to enjoy the feta cubes easily.
Vegetable Pairings: Fresh and Crisp Choices
1. Raw Vegetables: Serve with an assortment of raw vegetables such as cucumber sticks, bell pepper slices, or cherry tomatoes. Their freshness beautifully contrasts the crispiness of the feta.
2. Grilled Vegetables: Grilled zucchini, eggplant, or asparagus can also be delightful accompaniments, adding a smoky flavor to the dish.
How to Incorporate Baked Feta into a Charcuterie Board
Baked feta crust cubes can shine on a charcuterie board. Here’s how to include them:
– Central Feature: Position the feta cubes at the center of the board, surrounded by an array of cured meats, olives, and pickles.
– Cheese Variety: Pair with other cheeses, such as aged cheddar or creamy brie, to create a diverse cheese selection.
– Nuts and Dried Fruits: Add a handful of almonds, walnuts, or dried fruits like figs and apricots to enhance texture and flavor diversity.
Nutritional Insights of Crispy Baked Feta Crust
Understanding the nutritional value of your crispy baked feta crust cubes can enhance your enjoyment of this dish while maintaining a balanced diet.
Analyzing the Nutritional Value of Each Ingredient
– Feta Cheese: Feta is a good source of protein and calcium. It contains healthy fats, which can contribute to heart health when consumed in moderation.
– Breadcrumbs: Whole wheat or gluten-free breadcrumbs can provide fiber, while traditional white breadcrumbs may offer fewer nutrients.
– Eggs: Eggs add protein and essential vitamins, contributing to the overall nutritional profile of the dish.
Understanding the Balance of Protein, Carbohydrates, and Fats
One serving of crispy baked feta crust typically contains a balanced mix of protein from the feta and egg, carbohydrates from the breadcrumbs, and healthy fats from the cheese. This balance makes it a satisfying snack or appetizer that can be enjoyed as part of a meal.
The Role of Portion Control in Enjoying This Dish Responsibly
While baked feta is delicious, it’s essential to practice portion control. Enjoying a few cubes alongside fresh vegetables or whole-grain bread can help maintain a balanced diet while satisfying cravings.
Culinary Variations and Customization Ideas
The beauty of crispy baked feta crust cubes lies in their adaptability. Here are some culinary variations and customization ideas to inspire your cooking:
Exploring Flavor Variations: Adding Spices and Herbs
1. Spice It Up: For a kick, incorporate spices like smoked paprika, cayenne pepper, or Italian seasoning into your breadcrumb mixture.
2. Herb Blends: Fresh or dried herbs such as rosemary, basil, or cilantro can add a unique flavor profile. Experiment with different combinations to find your favorite.
Considering Dietary Restrictions: Gluten-Free and Vegan Options
1. Gluten-Free Breadcrumbs: Substitute traditional breadcrumbs with gluten-free options made from rice or almond flour to accommodate gluten sensitivities.
2. Vegan Alternatives: For a dairy-free version, consider using a plant-based cheese that melts well. Many brands offer feta-style vegan cheeses that can be coated and baked similarly.
Experimenting with Different Cheeses: Alternatives to Feta
1. Goat Cheese: Creamy goat cheese can be a delightful substitute, providing a tangy flavor that pairs well with the crispy coating.
2. Mozzarella: For a milder taste, try using fresh mozzarella. While it may not achieve the same crispiness, it will create a deliciously gooey texture.
Conclusion
Crispy baked feta crust cubes offer a delightful combination of flavors and textures that are sure to impress. With its simple preparation process and versatile serving options, this dish is perfect for any occasion. Whether enjoyed as an appetizer, a main dish, or part of a larger spread, the satisfaction derived from this recipe is unmatched. Try this timeless favorite, and experience the joy of homemade crispy baked feta crust cubes in your kitchen. Embrace the opportunity to customize and experiment with this dish to suit your taste preferences, dietary needs, and culinary creativity. Enjoy the deliciousness that awaits!