Coconut Lemon Bliss Bars: A Refreshing Dessert Delight
As we delve into the world of desserts, few treats capture the essence of summer as beautifully as Coconut Lemon Bliss Bars. These delightful squares are not only visually appealing with their sunny yellow hue but also tantalizingly flavorful, making them a perfect choice for any occasion. The combination of zesty lemon and creamy coconut creates a refreshing harmony that tantalizes the taste buds, offering a unique dessert experience that is both satisfying and invigorating.
The appeal of Coconut Lemon Bliss Bars lies in their delightful juxtaposition of flavors. The tartness of fresh lemon juice and zest harmonizes beautifully with the sweet, nutty essence of coconut, creating a dessert that is as refreshing as it is indulgent. Whether you’re serving them at a summer barbecue, a birthday celebration, or simply enjoying a sweet treat at home, these bars are sure to impress.
Moreover, this recipe embraces health-conscious ingredients that not only enhance flavor but also offer nutritional benefits. Coconut flour, a central ingredient in this recipe, is gluten-free and high in fiber, making it an excellent alternative to traditional flours. Similarly, incorporating yogurt adds a creamy texture while providing probiotics that support gut health. The thoughtful selection of ingredients, paired with their health benefits, makes Coconut Lemon Bliss Bars a guilt-free indulgence.
One of the most appealing aspects of this recipe is its ease of preparation. With minimal steps and straightforward ingredients, even novice bakers can whip up a batch of these blissful bars with little effort. Additionally, the versatility of the recipe allows for various adaptations to suit personal tastes or dietary preferences. Whether you prefer a sweeter or tangier flavor profile, you can easily adjust the sweetness by varying the amount of honey or maple syrup used.
The Allure of Tropical Flavors
The popularity of coconut and lemon in desserts is undeniable. Coconut, with its rich, creamy texture and subtle sweetness, is a staple in many tropical cuisines, from Southeast Asia to the Caribbean. Lemon, on the other hand, is cherished for its bright flavor and invigorating aroma. Together, these ingredients evoke a sense of relaxation and escape, transporting you to a sun-soaked beach with every bite.
Tropical flavors like coconut and lemon have a unique ability to uplift the spirit. They remind us of carefree vacations, sandy shores, and warm breezes, making them a perfect choice for desserts that aim to bring a sense of joy and indulgence. The cultural significance of coconut is also noteworthy; it features prominently in various culinary traditions around the world, often symbolizing abundance and hospitality.
By incorporating these flavors into a dessert, you’re not just creating a treat; you’re crafting an experience that resonates with the joyful essence of summer and the vibrant cultures that celebrate these ingredients.
Understanding the Ingredients
To create the perfect Coconut Lemon Bliss Bars, it’s essential to understand the role and benefits of each ingredient. Here’s a breakdown of what makes these bars so special:
– Coconut Flour: This gluten-free flour is made from dried coconut meat and is rich in fiber, making it a healthier alternative to traditional flour. It absorbs moisture well, adding a light texture to baked goods while keeping them moist.
– Unsweetened Shredded Coconut: This ingredient contributes both flavor and texture to the bars. It adds a delightful chewiness that complements the creamy base, enhancing the overall coconut experience.
– Butter: A key player in baking, butter provides a rich, moist base that enhances the flavor profile of the bars. It helps to create a satisfying crust that holds together beautifully.
– Honey or Maple Syrup: These natural sweeteners not only add sweetness but also impart their unique flavors. Honey brings a floral note, while maple syrup adds a warm, earthy sweetness that pairs well with the citrus.
– Eggs: Essential for binding the ingredients together, eggs provide structure and stability to the bars. They also add a richness that enhances the overall texture.
– Yogurt: Incorporating yogurt into the recipe adds creaminess and moisture, elevating the mouthfeel of the bars. It also offers a dose of probiotics, contributing to their health benefits.
– Lemon Zest and Juice: The zest and juice of fresh lemons are crucial for enhancing the flavor profile. They provide a bright, tangy flavor that balances the sweetness of the bars and adds a refreshing quality.
– Sugar: While other natural sweeteners provide a base sweetness, a touch of sugar helps to balance the tartness of the lemon, ensuring a harmonious flavor throughout.
Step-by-Step Instructions for Coconut Lemon Bliss Bars
To embark on your journey to create these delicious Coconut Lemon Bliss Bars, start by preparing your workspace and gathering your ingredients. Proper preparation is key to ensuring a smooth baking process.
1. Preheat the Oven: Begin by preheating your oven to 350°F (175°C). Ensuring the oven reaches the correct temperature is essential for even baking; it allows the bars to rise and set properly, resulting in a perfect texture.
2. Preparing the Base: In a mixing bowl, combine the coconut flour and shredded coconut with melted butter. This mixture will form the crust of your bars. Use a fork or your hands to mix the ingredients until they’re well combined and crumbly. Press this mixture firmly into the bottom of a lined baking dish to create an even layer. This step is crucial for achieving a sturdy base that can hold the creamy lemon filling.
As you progress through these initial steps, you’ll begin to see how simple it is to bring this refreshing dessert to life. The tantalizing combination of coconut and lemon flavors, paired with the health benefits of the ingredients, makes Coconut Lemon Bliss Bars a standout choice for anyone looking to indulge in a guilt-free treat. Stay tuned as we continue with the detailed instructions and tips for creating these delectable bars.
Pressing the Mixture: Tips for Ensuring an Even Layer
Once you have your crust mixture ready, it’s time to press it into your baking pan. To ensure an even layer, first, line your pan with parchment paper, allowing some overhang on the sides for easy removal. This makes it easier to lift the bars out after baking.
Using a flat-bottomed measuring cup or your fingers, press the mixture firmly into the bottom of the pan. Start from the center and work your way outwards to the edges. Make sure the layer is compact and uniform, as this helps achieve a perfect crust that holds together after baking. If you notice any dry spots, take some extra mixture and fill them in. Remember, a well-pressed crust creates a delicious foundation for your Coconut Lemon Bliss Bars.
Baking the Crust: Signs to Look for to Know When It’s Ready
After pressing your crust mixture, it’s time to bake it. Preheat your oven to 350°F (175°C). Bake the crust for about 10 to 12 minutes, or until it’s lightly golden brown around the edges. Keep a close eye on it; the crust should be firm to the touch and have a slight bounce when tapped. A well-baked crust is crucial as it prevents the filling from becoming soggy.
Look for a golden hue and a slight crackling sound when you take it out of the oven. Allow the crust to cool in the pan while you prepare the filling, which will help it firm up even more.
Preparing the Filling: Techniques for a Smooth and Creamy Mixture
For the filling, you will need coconut yogurt, fresh lemon juice, lemon zest, and a sweetener of your choice. Start by whisking the coconut yogurt in a large mixing bowl until it becomes smooth and creamy. This step is essential for achieving the perfect texture in your bars.
Next, gradually add in the fresh lemon juice and zest, mixing well to combine. If using a sweetener like maple syrup or honey, add it at this stage. Whisk thoroughly until the filling is smooth with no lumps. If you prefer a sweeter filling, taste and adjust the sweetness before pouring it onto the crust.
Using fresh lemon juice not only enhances the flavor but also adds to the tanginess that complements the sweet coconut base.
Pouring the Filling: Tips for Avoiding Air Bubbles
When it’s time to pour the filling over the cooled crust, do so slowly and evenly. To minimize air bubbles, pour the filling from a height of about 4 inches above the crust, allowing it to flow gently and settle naturally.
If you notice any bubbles forming, gently tap the pan on the countertop to help release them. A toothpick can also be used to pop any surface bubbles. This step is important for a polished, professional-looking bar.
Baking Again: What to Expect During the Second Baking Phase
Once the filling is poured over the crust, return the pan to the oven and bake for another 20 to 25 minutes. During this time, the filling will set and firm up. You’ll know it’s ready when the edges are slightly firm to the touch, but the center still has a slight jiggle.
Don’t overbake, as it can lead to a dry texture. Once baked, remove the pan from the oven and allow it to cool at room temperature for a few minutes before transferring it to the refrigerator.
Cooling Down: The Importance of Chilling for Texture
Chilling your Coconut Lemon Bliss Bars is a crucial step that enhances their texture and flavor. After letting the bars cool at room temperature for about 10 minutes, cover the pan with plastic wrap or foil and refrigerate for at least 2 to 3 hours, or overnight if possible.
This chilling time allows the filling to set properly, resulting in a firmer bar that’s easier to cut into neat squares. The flavors will also meld beautifully during this time, creating a delightful balance of coconut and lemon.
Serving and Garnishing: Creative Ideas for Presentation
When you’re ready to serve, lift the bars out of the pan using the parchment overhang. Cut into squares or rectangles, depending on your preference.
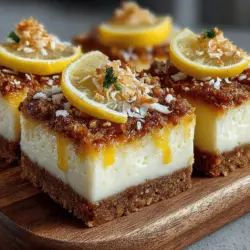
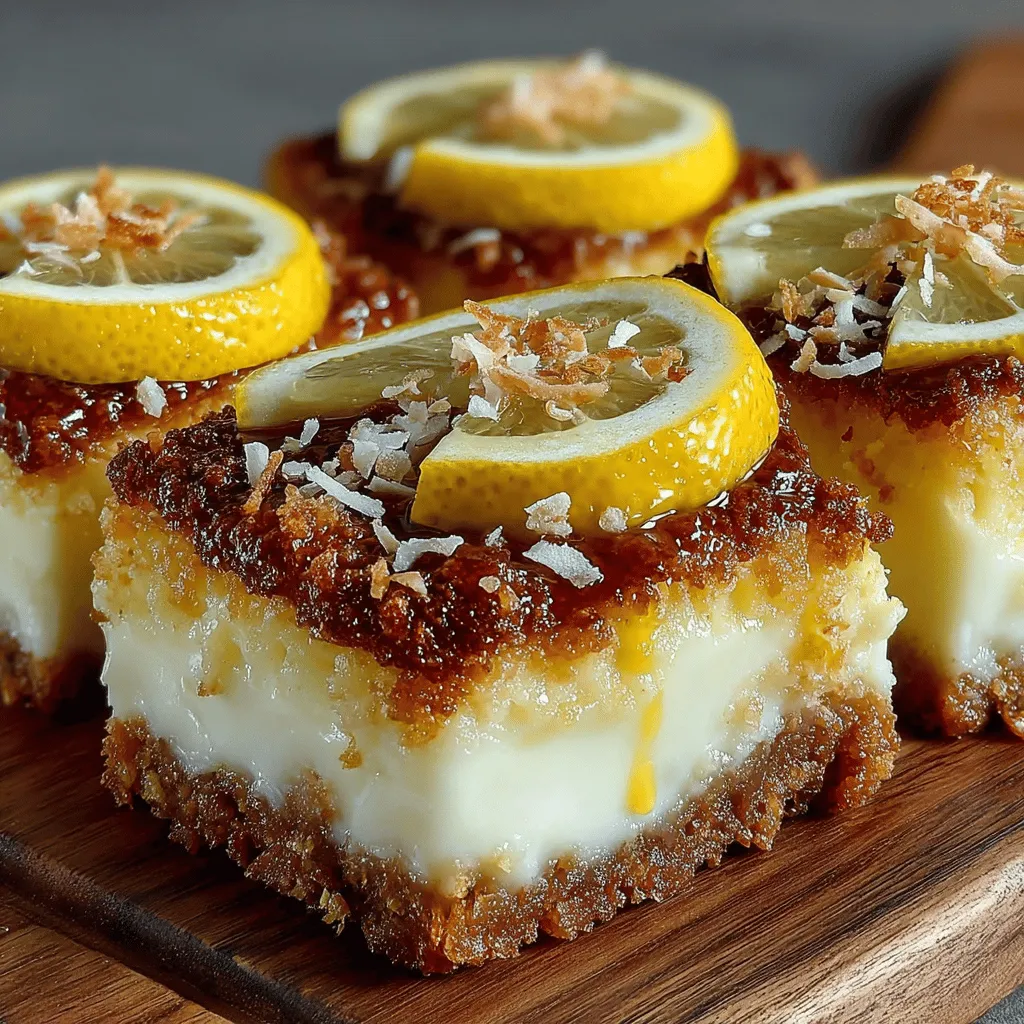
For a beautiful presentation, consider garnishing with fresh lemon slices, a sprinkle of toasted coconut, or a drizzle of melted white chocolate. Adding some zest of lemon on top can also enhance the visual appeal while emphasizing the citrus flavor.
If you’re feeling adventurous, try adding a few fresh berries on the side for a pop of color and additional flavor. These Coconut Lemon Bliss Bars are not only delicious but also visually stunning, making them the perfect treat for any occasion.
Nutritional Information
Each serving of Coconut Lemon Bliss Bars offers a delightful balance of flavor and nutrition. For a standard serving size (approximately 1 bar), you can expect around 150 calories. The breakdown typically includes:
– Total Fat: 8g
– Saturated Fat: 6g
– Carbohydrates: 20g
– Fiber: 3g
– Sugars: 8g
– Protein: 2g
Using coconut flour instead of all-purpose flour not only adds a unique flavor but also offers more fiber and healthy fats. Coconut yogurt provides probiotics, making this treat not only indulgent but also beneficial for gut health. Compared to traditional dessert bars, which can be loaded with refined sugars and unhealthy fats, these bars provide a healthier alternative without sacrificing taste.
Variations and Customizations
Feel free to customize your Coconut Lemon Bliss Bars to suit your dietary preferences. For those looking for alternative sweeteners, consider using agave syrup, stevia, or monk fruit sweetener. Each option offers its unique flavor profile and sweetness level, allowing you to tailor the recipe to your liking.
Additionally, you can experiment with flavor additions. A teaspoon of vanilla or almond extract can enhance the overall taste, bringing a new dimension to your bars.
For garnishing, beyond the lemon slices and toasted coconut, consider crushed nuts or a sprinkle of chia seeds for added texture and nutrition. Fresh mint leaves can add a refreshing touch, making your presentation even more appealing.
Storage and Freezing Tips
To ensure the longevity of your Coconut Lemon Bliss Bars, proper storage is essential. Keep the bars in an airtight container in the refrigerator for up to one week. If you plan to enjoy them later, freezing is a great option.
To freeze, cut the bars into squares and place them in a single layer on a parchment-lined baking sheet. Freeze until solid, then transfer them to a freezer-safe container or bag, separating layers with parchment paper to prevent sticking. These bars can be frozen for up to 3 months without losing quality.
When you’re ready to indulge, simply thaw them in the refrigerator overnight for the best texture.
Conclusion
Making Coconut Lemon Bliss Bars is not only a delightful culinary experience but also a chance to enjoy a healthier dessert that satisfies sweet cravings. The combination of coconut and lemon creates a refreshing flavor profile that is perfect for any gathering, from casual backyard barbecues to festive holiday celebrations.
Encourage yourself to experiment with the recipe, whether by trying different sweeteners or adding your own unique garnishes. The versatility of these bars means they can be customized to suit any occasion or personal taste.
With their tropical twist and wholesome ingredients, these Coconut Lemon Bliss Bars are sure to become a favorite in your dessert repertoire. Enjoy making them and sharing the bliss with friends and family!