Introduction to Choco-Oat Bliss Bars
In the quest for healthy snacking options that don’t compromise on taste, Choco-Oat Bliss Bars emerge as a standout choice. These no-bake bars encapsulate a delightful combination of rich chocolate flavor and wholesome ingredients, making them a go-to for anyone seeking a quick snack or a satisfying dessert. As the popularity of healthy eating continues to rise, these bars offer a perfect solution for those looking to indulge without the guilt.
What sets Choco-Oat Bliss Bars apart is their simplicity and versatility. They are packed with rolled oats, which serve as a hearty base, accompanied by creamy nut butter and a hint of natural sweetness. This unique blend not only satisfies your cravings but also provides a nourishing source of energy to fuel your day. Whether you’re in need of a post-workout treat or a midday pick-me-up, Choco-Oat Bliss Bars are designed to please everyone in the family. They are not just a snack; they are a wholesome alternative that can easily fit into any lifestyle.
Understanding the Ingredients
To truly appreciate the Choco-Oat Bliss Bars, it’s essential to explore the key components that make them both delicious and nutritious. Each ingredient plays a crucial role in contributing to the overall flavor and health benefits of these bars.
Importance of Rolled Oats in Nutrition
Rolled oats are the foundation of Choco-Oat Bliss Bars and for good reason. They are a powerhouse of nutrition, rich in dietary fiber, which is essential for digestive health. Fiber helps to maintain a healthy gut, lowers cholesterol levels, and promotes a feeling of fullness, making it easier to control appetite. Additionally, rolled oats provide complex carbohydrates that release energy slowly, ensuring you stay energized throughout the day. This makes them an excellent choice for athletes and anyone with an active lifestyle.
Benefits of Nut Butter (Peanut or Almond)
Nut butter, whether it’s peanut or almond, adds a creamy texture while delivering a significant protein boost. Protein is a vital macronutrient that supports muscle repair and growth, making nut butter a great addition for those who engage in physical activity. Moreover, nut butters are rich in healthy fats, which are important for heart health and can help improve cholesterol levels. They also provide essential vitamins and minerals, including vitamin E, magnesium, and potassium, further enhancing the nutritional profile of these bliss bars.
Sweeteners: Honey vs. Maple Syrup
When it comes to sweetening the Choco-Oat Bliss Bars, both honey and maple syrup are excellent options, each bringing its own unique flavor and benefits. Honey is known for its natural antibacterial properties and is a great source of antioxidants. It’s also a humectant, which means it helps retain moisture, providing the bars with a chewy texture. On the other hand, maple syrup is a lower glycemic index alternative, which can be beneficial for those looking to manage blood sugar levels. It also contains a variety of minerals, including manganese and zinc, making it a nutritious choice.
The Role of Cocoa Powder in Flavor and Health
Cocoa powder is the star ingredient that delivers the rich chocolate flavor we crave. Beyond its taste, cocoa powder is packed with antioxidants, which are known to combat oxidative stress and inflammation in the body. This can contribute to overall well-being and even improve mood, thanks to the presence of compounds like flavonoids. Incorporating cocoa powder into your diet can provide heart health benefits, improve cognitive function, and even enhance physical performance.
Dark Chocolate Chips: A Guilt-Free Indulgence
For those who love a touch of indulgence, dark chocolate chips are the perfect addition to Choco-Oat Bliss Bars. Unlike milk chocolate, dark chocolate is higher in cocoa content and lower in sugar, making it a healthier option. It is rich in antioxidants and has been linked to various health benefits, including improved heart health and enhanced brain function. The addition of dark chocolate chips not only elevates the taste but also allows you to enjoy a sweet treat without the guilt.
Optional Ingredients: Shredded Coconut and Nuts
While the core ingredients of Choco-Oat Bliss Bars create a delightful treat on their own, optional ingredients like shredded coconut and nuts can enhance both flavor and nutrition. Shredded coconut adds a tropical twist and a chewy texture, while also providing healthy fats and fiber. Nuts, such as walnuts or almonds, can introduce a satisfying crunch and additional protein, making these bars even more filling. These optional ingredients allow for customization based on personal preference, making the bars adaptable to various tastes and dietary needs.
Step-by-Step Preparation of Choco-Oat Bliss Bars
Now that we’ve explored the ingredients that contribute to the deliciousness and health benefits of Choco-Oat Bliss Bars, it’s time to dive into the preparation process. Creating these bars is straightforward and requires minimal cooking skills, making it an accessible recipe for everyone.
Gather Your Ingredients
To start, gather the following ingredients:
– 2 cups rolled oats
– 1 cup nut butter (peanut or almond)
– 1/3 cup honey or maple syrup
– 1/4 cup cocoa powder
– 1/2 cup dark chocolate chips
– Optional: 1/2 cup shredded coconut and/or 1/2 cup chopped nuts
Mixing the Base
In a large mixing bowl, combine the rolled oats and cocoa powder. Stir them together until evenly mixed. In a separate bowl, combine the nut butter and honey (or maple syrup). Gently heat this mixture in the microwave for about 20-30 seconds to soften it, making it easier to combine. Stir until smooth.
Next, pour the nut butter and sweetener mixture into the bowl with the oats and cocoa powder. Mix thoroughly until all the dry ingredients are coated. This step is crucial for ensuring that each ingredient is well-distributed, providing consistent flavor and texture in every bite.
Adding Chocolate Chips and Optional Ingredients
Once the base is mixed, fold in the dark chocolate chips. If you’re using shredded coconut or chopped nuts, this is the time to add them as well. Gently stir until everything is well incorporated, ensuring that the chocolate chips are evenly distributed throughout the mixture.
Forming the Bars
Prepare an 8×8 inch or 9×9 inch baking pan by lining it with parchment paper. This will make it easier to remove the bars once they’re set. Transfer the mixture into the pan, pressing it down firmly and evenly with a spatula or your hands. The bars need to be compact to hold together when cut, so don’t shy away from applying some pressure.
Chill and Set
Once the mixture is evenly spread, cover the pan with plastic wrap or foil and place it in the refrigerator. Allow the bars to chill for at least 1-2 hours. This step is essential, as it helps the ingredients meld together and firm up, making them easier to cut into bars.
After the chilling period, your Choco-Oat Bliss Bars will be ready to enjoy. With their rich chocolate flavor and satisfying texture, they make for a perfect healthy snack or dessert option that the whole family will love.

Preparing the Base: Mixing Dry Ingredients
To start your Choco-Oat Bliss Bars, the first step is to prepare the base by mixing the dry ingredients. In a large mixing bowl, combine rolled oats, whole wheat flour, cocoa powder, and a pinch of salt. These ingredients are the backbone of your bliss bars, providing essential nutrients and a rich chocolate flavor. Make sure to mix them evenly, as this will ensure that every bite of your bars has a consistent taste and texture. Use a whisk to break up any clumps in the cocoa powder or flour, allowing for a smoother batter later on.
Melting the Sweet Mixture: Ensuring a Smooth Consistency
Next, it’s time to melt your sweet mixture, which typically consists of nut butter and sweeteners like maple syrup or honey. In a small saucepan, combine the nut butter and sweetener over low heat. Stir continuously until the mixture is smooth and well-blended. This step is crucial because a well-melted mixture will incorporate seamlessly with your dry ingredients, resulting in a cohesive and gooey base for your bars. Be cautious not to overheat, as you don’t want to compromise the flavor or burn the nut butter. Once melted, remove from heat and let it cool slightly before adding it to the dry ingredients.
Combining Everything: Importance of Thorough Mixing
Now it’s time to bring your dry and wet ingredients together. Pour the melted sweet mixture into the bowl with the dry ingredients, and use a sturdy spatula or wooden spoon to combine them thoroughly. It’s essential to mix well at this stage to ensure that all the dry ingredients are coated and evenly distributed. Take your time with this step, as insufficient mixing can lead to uneven texture in the final product. You should aim for a thick, sticky batter that holds together when pressed.
Adding Chocolate Chips: Timing for the Best Texture
Once your mixture is well combined, it’s time to fold in the chocolate chips. This is a key step that adds extra indulgence to your bars. However, timing is crucial here—allow the mixture to cool slightly before adding the chocolate chips to prevent them from melting completely. Gently fold the chips into the mixture until evenly distributed. This ensures that you’ll have delightful pockets of chocolate in every bite, adding a rich flavor that complements the oat base.
Pressing into the Pan: Techniques for Compression
With your mixture ready, it’s time to press it into the prepared baking pan. Line an 8×8 inch or 9×9 inch square pan with parchment paper for easy removal later. Transfer the mixture into the pan and use a spatula or your hands to press it down firmly and evenly. This step is crucial for achieving the right texture; a well-compressed mixture will hold its shape after baking. Make sure to smooth out the top to create a uniform surface. If desired, you can sprinkle a few extra chocolate chips on top for added flair.
Chilling Time: Why It’s Crucial for Texture
After pressing the mixture into the pan, it’s important to chill the bars in the refrigerator for at least 30 minutes before baking. This chilling time allows the nut butter and sweetener to firm up, resulting in a better texture when baked. It also helps the flavors meld together, enhancing the overall taste of your bars. While you wait, preheat your oven to 350°F (175°C) so it’s ready when your bars are done chilling.
Customization Options for Choco-Oat Bliss Bars
Making the Recipe Your Own
One of the best things about Choco-Oat Bliss Bars is their versatility. Here are several ways to customize the recipe to suit your taste and dietary preferences:
Varying Nut Butters: Flavor and Texture Differences
While almond butter and peanut butter are popular choices, feel free to experiment with other nut butters like cashew or sunflower seed butter. Each nut butter brings its unique flavor and texture, allowing you to create a different taste profile for your bars. For example, cashew butter offers a creamier texture, while sunflower seed butter provides a nut-free option that’s just as delicious.
Sweetness Adjustments: Finding Your Perfect Balance
Depending on your sweetness preference, you can adjust the amount of sweetener used in the recipe. If you prefer a less sweet bar, reduce the amount of maple syrup or honey. Alternatively, for a sweeter treat, add a bit more. Keep in mind that the sweetness of the chocolate chips also contributes to the overall flavor, so consider this when adjusting your sweetener.
Creative Add-ins: Dried Fruits, Seeds, or Spices
To enhance the nutritional value and flavor of your Choco-Oat Bliss Bars, consider adding dried fruits, such as cranberries, raisins, or apricots. You can also incorporate seeds like chia or flaxseed for added crunch and health benefits. If you want to introduce a hint of spice, a dash of cinnamon or nutmeg can elevate the flavor profile. Be sure to adjust the ratios of other ingredients slightly to maintain the right consistency.
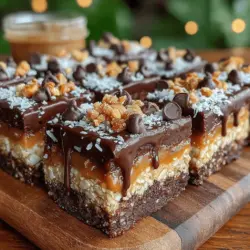
Drizzling Options: Experimenting with Toppings
For an extra touch of indulgence, consider drizzling melted chocolate or nut butter over the top of your bars once they’ve cooled. This not only adds visual appeal but also enhances the flavor. You can experiment with white chocolate, dark chocolate, or even a mix of both for a delightful contrast.
Storing and Serving Choco-Oat Bliss Bars
Best Practices for Enjoyment
To keep your Choco-Oat Bliss Bars fresh and delicious, proper storage is essential. Once completely cooled, transfer them to an airtight container. This will help preserve their texture and flavor while preventing them from drying out.
Shelf Life: How Long These Bars Stay Fresh
When stored correctly, your bliss bars can last up to one week at room temperature. For longer storage, consider refrigerating them, where they can last for about two weeks. If you want to keep them even longer, you can freeze the bars. Wrap each one individually in plastic wrap and store them in a freezer-safe bag. They can last up to three months in the freezer, making them a perfect option for meal prep.
Serving Suggestions: Pairing Ideas for a Delightful Experience
Choco-Oat Bliss Bars are perfect for any occasion, whether as a quick snack, a post-workout boost, or a sweet treat for dessert. To elevate your serving experience, pair the bars with your favorite beverages. A cup of coffee or a glass of almond milk complements these bars beautifully. For a fun twist, try serving them alongside yogurt or ice cream for a delightful dessert option that will satisfy your sweet tooth.
Conclusion: The Joy of Homemade Choco-Oat Bliss Bars
In conclusion, Choco-Oat Bliss Bars are an indulgent yet nutritious treat that you can easily whip up in your own kitchen. With their delicious taste and customizable options, they can fit into various dietary preferences and occasions. By following our detailed recipe and enjoying the health benefits of each ingredient, you can create a satisfying snack that will keep you coming back for more. Embrace the joy of homemade treats with this simple and delightful recipe that promises to be a hit among all ages. So gather your ingredients, unleash your creativity, and enjoy the process of making these blissful bars that are sure to become a staple in your home!