Introduction
Heavenly Nun’s Puffs are a delightful pastry that captures the hearts and taste buds of many around the world. These airy, light confections are not only a joy to eat but also a fascinating part of culinary history. Originating from the French tradition, Nun’s Puffs, or “Choux de Nuns,” have become a beloved treat in various cultures, each adding its own twist to the recipe. Their enchanting name evokes images of soft, pillowy pastries that seem to float from the heavens, making them perfect for any occasion, from cozy family gatherings to grand celebrations.
What makes these pastries truly “heavenly” is their unique texture and flavor. The combination of simple ingredients creates a light, airy structure that melts in your mouth. When baked to perfection, they puff up beautifully, creating hollow centers ready to be filled with your favorite creams or served dusted with powdered sugar. In this article, we will explore the rich history of Nun’s Puffs, delve into the ingredients that make this recipe special, and guide you through the preparation steps to achieve your very own batch of these delightful treats.
Understanding Nun’s Puffs
The Historical Background of Nun’s Puffs
Nun’s Puffs trace their roots back to the culinary traditions of France, particularly within the context of religious orders. The name itself suggests a connection to nuns, which is reflective of the pastries being created in convent kitchens where simplicity and elegance were often paramount. These pastries likely emerged in the late 19th century, blending French cooking techniques with the need for desserts that could be easily made with minimal ingredients, yet deliver maximum flavor.
Origins and Cultural Significance
While the exact origin of Nun’s Puffs may be shrouded in mystery, they have made their way into various cultures, adapting to local tastes and customs. In some regions, they are known as “Choux de Nuns,” while in others, similar pastries may bear different names but maintain the same fundamental concept. The appeal of these pastries crosses borders, allowing them to be appreciated by diverse communities who cherish their light texture and ability to be filled with sweet or savory fillings.
Variations Found in Different Cuisines
As Nun’s Puffs spread across the globe, they have inspired countless variations. In Italian cuisine, for example, you might find a similar pastry known as “Zeppole,” often filled with sweet cream or custard and topped with fruit. In other cultures, they may be served with different flavorings or fillings, ranging from rich chocolate to zesty citrus creams. This adaptability not only speaks to the versatility of the dough but also showcases the creativity of bakers everywhere.
Why They Are Called “Nun’s Puffs”
The whimsical name “Nun’s Puffs” is believed to stem from the pastries’ soft, pillowy appearance, reminiscent of a nun’s habit. The gentle rise of the dough during baking creates a light and airy structure that embodies the essence of heavenly bliss. Furthermore, the idea of nuns baking these treats adds a layer of charm and nostalgia, reminding us of simpler times when desserts were crafted with care and devotion.
The Connection to Religious Traditions and Culinary History
The connection of Nun’s Puffs to religious traditions highlights the role of convent kitchens in culinary history. Many convents were known for their exceptional baking skills, often producing pastries not just for their own consumption but also for local communities. This tradition of sharing and hospitality continues to resonate today, as Nun’s Puffs are often served at gatherings and celebrations, embodying the spirit of joy and togetherness.
Ingredients Breakdown
Creating perfect Nun’s Puffs requires a balance of simple ingredients that work together to produce a light, airy pastry. Let’s take a closer look at each component and its role in this heavenly recipe.
Detailed Description of Each Ingredient
1. Water: Water is essential in the dough-making process, acting as the base that brings all the ingredients together. It helps hydrate the flour and is crucial for creating steam during baking, which contributes to the puffs rising.
2. Butter: The inclusion of butter adds richness and flavor to the dough. When melted and combined with water, it creates an emulsion that helps achieve a tender texture. The fat in the butter also plays a significant role in the overall flavor profile of the finished pastry.
3. All-Purpose Flour: All-purpose flour is the backbone of the dough, providing structure and stability. Its gluten content allows for the necessary elasticity while still being soft enough to produce light puffs. Using the right flour is critical to achieving that characteristic rise and texture.
4. Eggs: Eggs are the magical ingredient that contributes to the airy texture of Nun’s Puffs. When beaten into the dough, they help create steam during baking, which expands and causes the pastry to puff up. Eggs also enrich the flavor and color of the puffs, giving them a beautiful golden hue.
5. Vanilla Extract: A splash of vanilla extract enhances the overall flavor of the pastries, infusing them with warmth and sweetness. This ingredient elevates the simple dough, making it more aromatic and appealing to the palate.
6. Salt: A pinch of salt may seem insignificant, but it is essential for balancing flavors. Salt enhances the sweetness of the pastry and helps to round out the overall taste, ensuring that each bite is satisfying.
7. Baking Powder: The addition of baking powder acts as a leavening agent, providing an extra lift to the dough. This ensures that the pastries achieve the desired puffiness and lightness, making them irresistible.
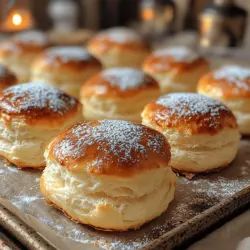
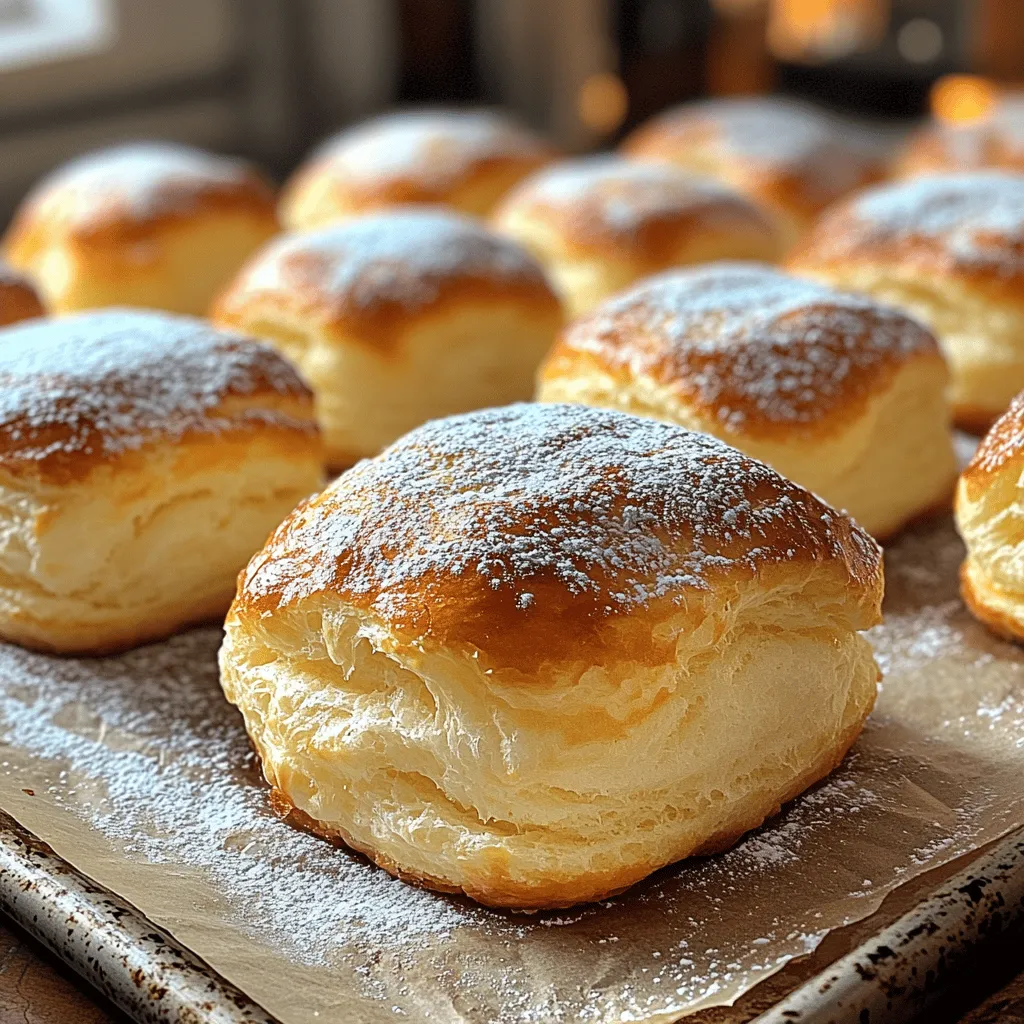
8. Powdered Sugar: Finally, powdered sugar serves as the finishing touch for these delightful pastries. Once baked and cooled, a light dusting of powdered sugar adds a touch of sweetness and a beautiful aesthetic that makes Nun’s Puffs truly look heavenly.
Preparation Steps Explained
Creating Nun’s Puffs may seem daunting, but with a clear understanding of the preparation steps, you’ll find that it’s a rewarding and enjoyable process. Let’s break down the essential steps to ensure your baking experience is as smooth as possible.
Preheating the Oven: Setting the Stage for Baking
Before you begin mixing your ingredients, it’s essential to preheat your oven to the right temperature. Typically, Nun’s Puffs are baked at a high temperature, around 400°F (200°C), which helps create the steam necessary for the puffs to rise. Preheating your oven ensures that the pastries start baking immediately upon entering, promoting that light and airy texture we all love.
Importance of the Right Temperature for Pastry Puffs
The temperature of your oven can significantly affect the outcome of your Nun’s Puffs. A higher temperature encourages rapid steam production, causing the dough to puff up quickly. If the oven is not hot enough, the puffs may not rise properly, resulting in denser pastries. Therefore, make sure to allow enough time for your oven to reach the desired temperature before baking.
Preparing the Dough: The Heart of the Recipe
With your oven preheated, it’s time to prepare the dough, which is the essence of Nun’s Puffs. Follow these steps to create the perfect base for your pastries.
1. Combine Water and Butter: In a saucepan, combine the water and butter over medium heat. Stir the mixture until the butter is completely melted and the water begins to simmer.
2. Add Flour: Once the butter has melted and the mixture is bubbling, remove the saucepan from heat. Gradually add the all-purpose flour, stirring vigorously with a wooden spoon until the mixture forms a smooth ball and pulls away from the sides of the pan. This is a crucial step that develops the dough’s structure.
3. Incorporate Eggs: Allow the mixture to cool slightly before adding the eggs. Add them one at a time, mixing well after each addition. The dough should become glossy and smooth, achieving a thick yet pipeable consistency.
4. Mix in Flavorings: Once all the eggs are incorporated, add the vanilla extract, salt, and baking powder. Stir until fully combined, ensuring that the flavor enhancers are evenly distributed throughout the dough.
Tips for Achieving the Right Consistency
– Check Dough Thickness: The dough should be thick enough to hold its shape but still soft enough to pipe. If it appears too runny, consider adding a bit more flour, but be cautious not to overdo it, as this can affect the texture.
– Piping the Dough: Once the dough reaches the desired consistency, transfer it to a piping bag fitted with a large round tip. This makes it easy to create uniform puffs on your baking sheet.
The Science Behind the Dough Pulling Away from the Pan
The moment when the dough pulls away from the sides of the pan is a key indicator that you have achieved the right consistency. This process, known as “pâte à choux,” is essential for creating the structure needed for puff pastry. The steam generated during baking will expand the air pockets formed within the dough, resulting in the light and airy texture characteristic of Nun’s Puffs.
As you embark on this culinary journey to create Heavenly Nun’s Puffs, remember that patience and attention to detail are crucial. The combination of simple ingredients and precise techniques will yield a batch of delicious pastries that are not only pleasing to the eye but also a delight to the palate. In the next part of this guide, we will explore the baking process and how to serve and enjoy these heavenly treats.
Incorporating Eggs: Achieving the Perfect Texture
When making Heavenly Nun’s Puffs, the incorporation of eggs is a critical step that significantly affects the texture of the puffs. To achieve the light and airy quality that defines these delightful pastries, you’ll want to add the eggs one at a time. This method allows for better emulsification and ensures that each egg is fully absorbed before introducing the next. If you add all the eggs at once, the dough may become too wet and lose its structure, resulting in heavy, dense puffs.
As you mix the eggs into the dough, keep an eye on the consistency. The right texture should be smooth and glossy, with a consistency that holds its shape but is still soft enough to be piped or spooned. A good test is to scoop a small amount with a spatula; it should fall slowly but hold its shape without being too runny. If the dough seems too thick, you can add a little water, one teaspoon at a time, until you reach the desired consistency.
Shaping the Puffs: Techniques for the Perfect Form
Shaping your Nun’s Puffs is where your creativity comes into play. There are two primary methods for shaping: using a spoon or a piping bag. Each technique has its advantages, and the choice often depends on your comfort level and the presentation you desire.
Spoon Method: If you opt for the spoon method, use two spoons to drop the dough onto the baking sheet. This method is straightforward and works well for a rustic look. Simply scoop a tablespoon of dough and use the second spoon to push it off onto the parchment paper, leaving space between each puff to allow for expansion.
Piping Bag Method: For a more polished appearance, a piping bag can be used. Fit a large round tip into the piping bag and fill it with the dough. Pipe rounds of dough about an inch apart on the baking sheet, creating a uniform shape. This method not only enhances presentation but also allows for more control over the size of each puff.
When spacing your puffs, ensure that they are at least two inches apart. As they bake, they will expand significantly, and proper spacing will prevent them from merging into one another, which could result in uneven shapes.
Baking the Nun’s Puffs
Now that your puffs are shaped and ready to go, it’s time for the baking process. Preheat your oven to 400°F (200°C) and place your baking sheet in the center of the oven. It’s crucial to avoid opening the oven door during the first 20 minutes of baking. Opening the door can cause a sudden drop in temperature, which may prevent the puffs from rising properly.
As they bake, keep an eye on visual cues for doneness. The puffs should turn a golden brown color and have a puffed appearance. Typically, they will take about 25-30 minutes to bake, but every oven is different, so check for doneness around the 20-minute mark. Gently press the top of a puff; it should feel firm and spring back slightly.
Cooling and Dusting: The Final Touches
Once your Nun’s Puffs are perfectly baked, it’s essential to cool them on a wire rack before dusting them with powdered sugar. Cooling allows the steam to escape, which helps maintain their light texture. If you dust them while still warm, the sugar may melt and create a sticky finish rather than a light dusting.
To dust effectively, use a fine mesh sieve or sifter to evenly distribute powdered sugar over the tops of the puffs. This technique creates a beautiful presentation and enhances the appeal of the puffs. A light, even coating will highlight their shape and texture without overwhelming their delicate flavor.
Serving Suggestions
Heavenly Nun’s Puffs can be enjoyed in various ways, making them a versatile treat for any occasion. Traditionally, they are served plain, allowing the lightness and buttery flavor of the pastry to shine through. However, for a modern twist, consider filling them with whipped cream or chocolate ganache. To do this, carefully cut a small opening in the side of each puff and use a piping bag to fill them, creating a delightful surprise for your guests.
For special occasions, you might want to get a bit more creative. Consider drizzling the puffs with a chocolate glaze or serving them alongside fresh fruits and a berry coulis. These additions not only enhance the flavor but also make for a visually stunning presentation that will impress at gatherings.
Nutritional Information
Understanding the nutritional content of Heavenly Nun’s Puffs can help you enjoy them mindfully. Each puff contains approximately 120 calories, depending on the size and specific ingredients used. Key nutrients include carbohydrates, protein, and fats, primarily from the eggs and butter.
If you have dietary restrictions, you can experiment with gluten-free alternatives. Using a gluten-free flour blend can yield acceptable results, although the texture may differ slightly. It’s advisable to follow specific gluten-free recipes or guidelines to ensure the best outcome.
Conclusion
Creating Heavenly Nun’s Puffs is a rewarding experience that brings joy and satisfaction to both the cook and those who indulge in them. The light, airy texture combined with the buttery flavor makes them a delightful treat for any occasion. Whether served plain or filled, these pastries can elevate your dessert table and impress your family and friends.
We encourage you to try this recipe, share the results with loved ones, and enjoy the process of making these traditional pastries. The delightful nature of Heavenly Nun’s Puffs will surely leave a lasting impression, and who knows, they might just become a beloved staple in your baking repertoire. Happy baking!