Introduction
Lemon desserts hold a special place in the hearts (and taste buds) of many. Their vibrant flavor is not just refreshing but also invigorating, making them perfect for any occasion, whether it’s a summer picnic or a festive holiday gathering. The allure of lemon desserts lies in their unique ability to strike a delicate balance between tartness and sweetness. In a well-crafted lemon cream pie, this balance is essential; the tartness of fresh lemons perfectly complements the creamy sweetness of sugar and dairy, creating a delightful experience with every bite.
The recipe we’re diving into today, the Zesty Citrus Dream: Lemon Cream Pie, epitomizes this balance. It is not just a dessert; it is a refreshing treat that embodies the essence of sunny days and cheerful gatherings. With its light and airy filling, this pie is an excellent choice for those seeking a palate-cleansing finish to a hearty meal or a bright addition to a dessert table. Whether you’re a seasoned baker or a novice in the kitchen, this recipe will guide you to create a lemon pie that is sure to impress your family and friends.
Understanding the Components of Lemon Cream Pie
To truly appreciate the Zesty Citrus Dream, we must first understand what makes a classic lemon cream pie so special. At its core, a lemon cream pie consists of three main components: the crust, the filling, and the topping. Each element plays a crucial role in the overall flavor profile and texture of the pie.
The Crust
The crust of a lemon cream pie is typically made from crushed graham crackers, providing a sweet and slightly nutty flavor that complements the tart lemon filling. The texture of the crust contributes to the pie’s overall experience; it should be firm enough to hold the filling while still being tender and easy to cut through. A well-prepared crust sets the stage for the rest of the pie, ensuring that the flavors meld beautifully.
The Filling
The filling is where the magic happens. It is a smooth, creamy concoction that marries the zesty brightness of fresh lemons with the rich creaminess of egg yolks and dairy. The real stars of the show are the lemon zest and juice, which infuse the filling with a vibrant flavor that awakens the senses. The filling is thickened using cornstarch, which adds a silky texture that contrasts beautifully with the crisp crust.
The Topping
While not a mandatory component, a light and fluffy topping, often made from whipped cream, adds an extra layer of indulgence. It provides a creamy contrast to the tartness of the filling, enriching the overall experience.
A Brief History
Lemon pies have a storied history that dates back to the 19th century, with variations appearing in various cultures. The classic lemon meringue pie is perhaps the most well-known version, featuring a fluffy meringue topping. However, the lemon cream pie offers a different approach, focusing on the creamy filling without the meringue. This dessert has evolved over the years, with home bakers and professional chefs alike adding their unique twists. Today, lemon cream pie remains a beloved classic, celebrated for its refreshing flavors and delightful texture.
Creating the Perfect Graham Cracker Crust
Now that we’ve set the stage, let’s focus on one of the most important components of our Zesty Citrus Dream: the graham cracker crust. The crust not only provides texture but also adds a layer of flavor that complements the zesty filling. Creating the perfect crust is a straightforward process that requires just a few simple ingredients.
Ingredients for the Graham Cracker Crust
– 1 ½ cups graham cracker crumbs
– ⅓ cup granulated sugar
– ⅓ cup unsalted butter, melted
Step-by-Step Instructions for Making the Crust
1. Preheat the Oven: Start by preheating your oven to 350°F (175°C). This ensures that your crust will bake evenly and achieve that perfect golden-brown color.
2. Prepare the Graham Cracker Crumbs: If you haven’t bought pre-made graham cracker crumbs, you can easily make your own. Simply place whole graham crackers in a food processor and pulse until they reach a fine crumb consistency. Measure out 1 ½ cups for the crust.
3. Mix the Ingredients: In a medium mixing bowl, combine the graham cracker crumbs and granulated sugar. Mix well to ensure the sugar is evenly distributed. Next, pour in the melted butter. Use a fork or your fingers to combine the mixture until it resembles wet sand. The butter should coat the crumbs fully, ensuring the crust holds together when pressed into the pie pan.
4. Press the Mixture into the Pie Pan: Take a 9-inch pie pan and evenly distribute the graham cracker mixture across the bottom and up the sides. Use the back of a measuring cup or your fingers to press the mixture firmly into the pan. Make sure there are no gaps or loose areas, as this will affect the crust’s integrity once baked.
5. Bake the Crust: Place the pie pan in the preheated oven and bake for about 8-10 minutes, or until the crust is lightly golden and fragrant. Keep an eye on it to prevent over-baking, as a dark crust can impart a bitter flavor.
6. Cool the Crust: Once baked, remove the crust from the oven and allow it to cool completely before adding the lemon filling. This step is crucial, as a warm crust can cause the filling to become runny.
Baking Tips for Achieving the Perfect Golden Crust
– Use Fresh Ingredients: Ensure your butter is fresh and at room temperature for better mixing. Stale graham crackers can lead to a less flavorful crust.
– Do Not Overmix: When combining the ingredients, be careful not to overmix. Overmixing can lead to a dense crust instead of a light and crumbly one.
– Blind Bake for a Crispier Texture: If you prefer an even crisper crust, consider blind baking it. To do this, line the crust with parchment paper and fill it with pie weights or dried beans. Bake for about 5 minutes longer, then remove the weights and continue baking until golden.
Crafting the Zesty Lemon Filling
With the graham cracker crust ready, it’s time to prepare the star of the show: the zesty lemon filling. This is where we capture the bright flavors of fresh lemons and create a lush, creamy filling that will have your guests asking for seconds.
Understanding the Ingredients for the Filling
Before diving into the preparation steps, let’s take a moment to discuss the key ingredients that contribute to the filling’s delicious flavor and texture.
– Lemon Zest and Juice: The zest contains essential oils that provide intense flavor, while the juice adds acidity that balances the sweetness.
– Granulated Sugar: Sweetens the filling, counteracting the tartness of the lemons.
– Egg Yolks: Provide richness and creaminess, as well as help thicken the filling.
– Cornstarch: Acts as a thickening agent, giving the filling a smooth and velvety texture.
– Butter: Adds richness and a luxurious mouthfeel to the filling.
Detailed Instructions for Preparing the Filling
1. Prepare the Ingredients: Gather all your filling ingredients and have them ready. This includes the lemon zest, lemon juice, sugar, egg yolks, cornstarch, and butter.
2. Combine Dry Ingredients: In a medium saucepan, whisk together the granulated sugar and cornstarch until well combined. This step is crucial to avoid lumps in your filling.
3. Add Liquids: Gradually whisk in the lemon juice and a cup of water. Make sure to incorporate the liquid slowly to prevent any clumping of the cornstarch.
4. Heat the Mixture: Place the saucepan over medium heat and bring the mixture to a gentle simmer, stirring constantly. As it heats, the mixture will begin to thicken. Pay close attention to prevent it from boiling over.
5. Temper the Egg Yolks: In a separate bowl, whisk the egg yolks until they are well combined. To prevent the yolks from curdling, you’ll need to temper them. Slowly pour about a cup of the hot lemon mixture into the bowl with the egg yolks, whisking constantly to combine. This gradually raises the temperature of the yolks.
6. Combine and Cook: Once tempered, pour the yolk mixture back into the saucepan with the remaining lemon mixture. Continue to cook over medium heat, stirring constantly, until the filling thickens further and starts to bubble. This should take about 1-2 minutes.
7. Add Zest and Butter: Once the filling has thickened, remove it from the heat. Stir in the lemon zest and butter until fully incorporated. The butter adds a luxurious richness and gloss to the filling.
By now, you have created a luscious lemon filling that is bursting with flavor. This filling will be poured into your cooled graham cracker crust, creating the perfect base for your Zesty Citrus Dream: Lemon Cream Pie.
In the next section, we’ll explore how to assemble the pie and add a delightful topping. Stay tuned as we dive deeper into perfecting this refreshing dessert!
Cooking Process to Achieve the Right Consistency and Flavor Balance
Creating the perfect lemon cream pie involves careful attention to detail during the cooking process. The filling must be smooth and creamy, yet firm enough to hold its shape when sliced. To achieve this, start by combining the sugar, cornstarch, and salt in a medium saucepan over medium heat. Gradually whisk in the milk and lemon juice, ensuring there are no lumps. Stir continuously until the mixture starts to thicken and bubbles gently, about 7-10 minutes. Once you see bubbles, reduce the heat to low and continue stirring for another minute to avoid burning.
Next, remove the saucepan from the heat and incorporate the egg yolks. This step is crucial for adding richness and smoothness to your filling. To prevent scrambling the yolks, temper them by adding a small amount of the hot mixture into the yolks before whisking them back into the saucepan. Return the mixture to the heat and cook for an additional 2-3 minutes until thickened. Finally, stir in the lemon zest and butter until fully melted and incorporated. The result should be a custard-like consistency that is both tangy and sweet, embodying the zesty flavor profile of your lemon cream pie.
Whipped Cream Topping: The Finishing Touch
No lemon cream pie is complete without a light and airy whipped cream topping that complements the dense filling. The whipped cream provides a delightful contrast in both texture and flavor, making each bite a balanced experience.
Instructions for Making the Whipped Cream Topping
1. Gather Your Ingredients: You will need 1 cup of heavy cream, 2 tablespoons of powdered sugar, and 1 teaspoon of vanilla extract. Make sure your heavy cream is cold, as this will help it whip up better.
2. Whip the Cream: In a medium bowl, combine the heavy cream, powdered sugar, and vanilla extract. Using a hand mixer or stand mixer, begin whipping on low speed, gradually increasing to medium-high.
3. Achieving Perfect Consistency: Continue whipping until soft peaks form, which should take around 3-5 minutes. Be careful not to overwhip, as this can lead to a grainy texture or even butter formation. Stop when the cream holds its shape but is still smooth and creamy.
4. Taste and Adjust: Before using, give your whipped cream a quick taste. If you prefer it sweeter, consider adding another teaspoon of powdered sugar.
Assembling Your Lemon Cream Pie
Now that your lemon filling and whipped cream are prepared, it’s time to assemble your pie.
Step-by-Step Guide to Layering the Pie
1. Pouring the Filling into the Cooled Crust: Start by pouring the lemon filling into the pre-baked and cooled pie crust. Use a spatula to spread it evenly, ensuring every part of the crust is filled.
2. Refrigeration Time for Optimal Flavor and Texture: Cover the pie with plastic wrap and refrigerate for at least 4 hours, or preferably overnight. This chilling time allows the filling to set properly and the flavors to meld beautifully, resulting in a more flavorful pie.
3. Suggestions for Garnishing: Once the pie has set, it’s time to add the finishing touches.
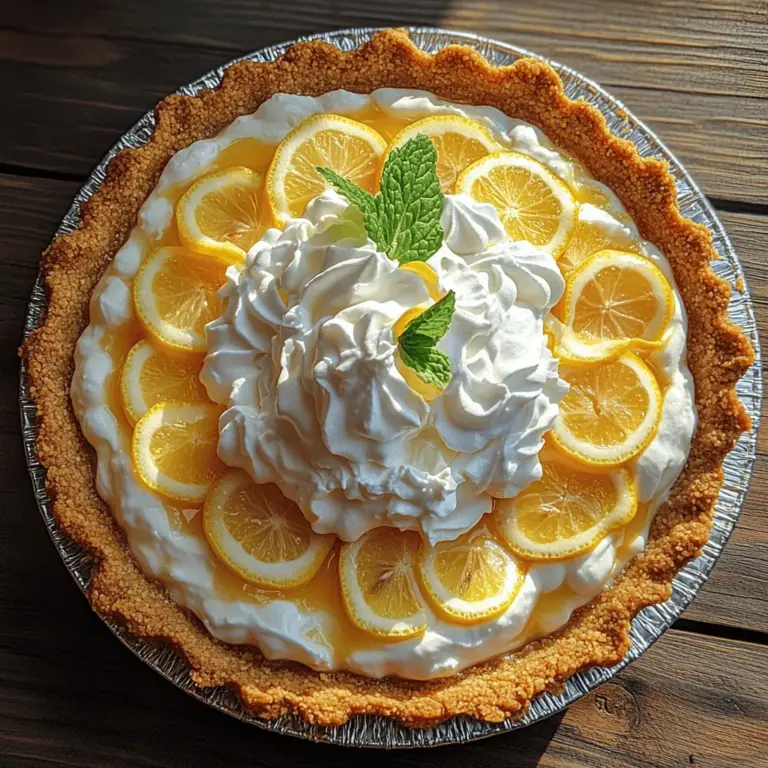
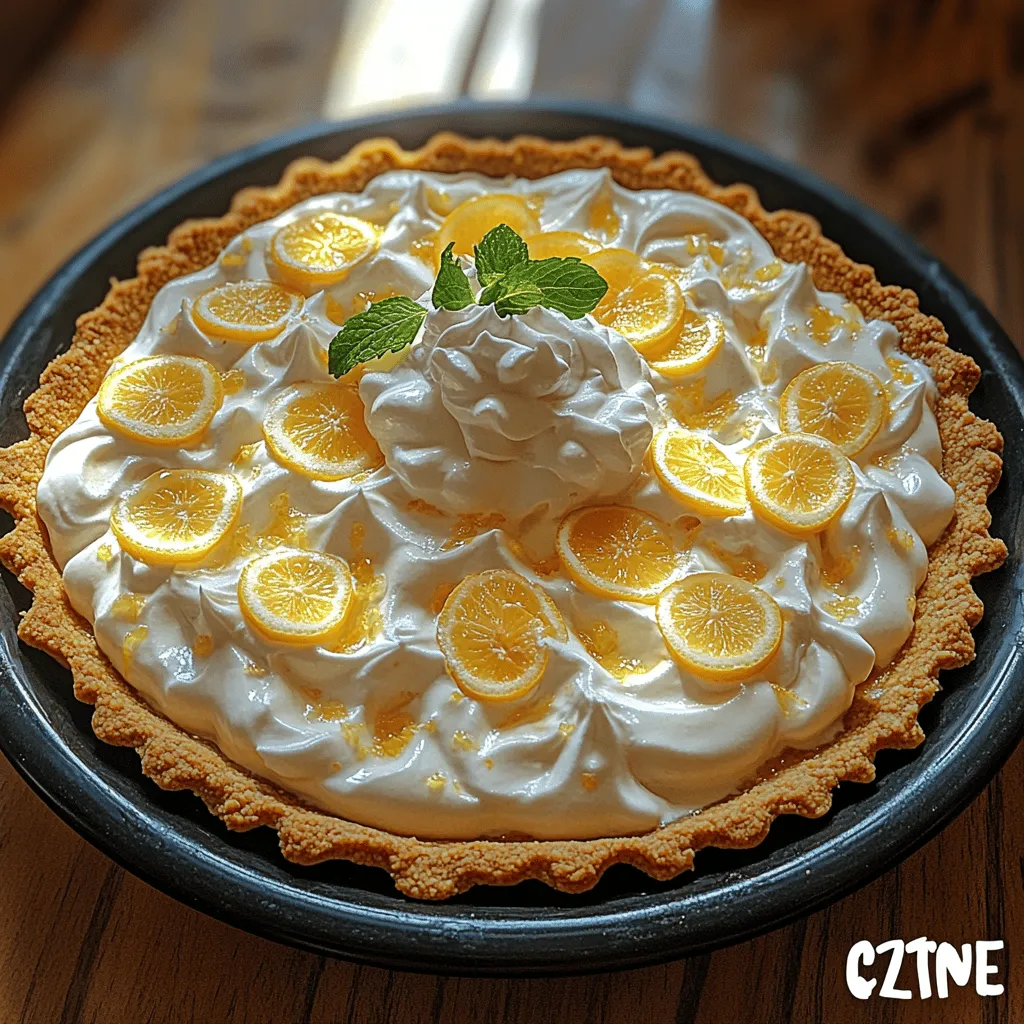
– Cutting and Arranging Lemon Slices: Thinly slice fresh lemons and arrange them in a circular pattern on top of the pie. This not only enhances the visual presentation but also adds an extra zing of citrus flavor.
– Using Mint Leaves for Color Contrast and Freshness: Scatter a few fresh mint leaves around the pie or on top of the whipped cream. The vibrant green adds a pop of color and a refreshing aroma that complements the lemon.
Serving Suggestions
To serve your lemon cream pie perfectly, consider these best practices:
1. Ideal Temperature and Presentation Tips: Serve the pie chilled, as this enhances its refreshing qualities. When ready to serve, use a sharp knife dipped in hot water to slice through the pie cleanly. Wipe the knife between cuts for neat slices.
2. Pairing Ideas with Beverages or Other Desserts: Lemon cream pie pairs wonderfully with a variety of beverages. Consider serving it alongside a refreshing iced tea or a glass of sparkling water with lemon slices for an added citrus note. If you want to elevate your dessert experience, serve it with a scoop of vanilla ice cream or a side of fresh berries for a delightful contrast.
Conclusion
The Zesty Citrus Dream: Lemon Cream Pie is a refreshing dessert that captures the essence of summer with its bright flavors and creamy texture. Its balance of tartness from the lemons and sweetness from the whipped cream creates an irresistible treat that’s perfect for any occasion.
We encourage you to try making this pie at home, as it offers a delightful baking experience and an even more rewarding tasting moment. Sharing homemade treats like this lemon cream pie with family and friends not only brings joy to your table but also creates lasting memories. Whether it’s a holiday gathering, a casual dinner party, or a simple family dessert, this pie is sure to impress. So roll up your sleeves, gather your ingredients, and embark on your journey to create this luscious lemon cream pie that promises to be a hit with everyone!
