Introduction
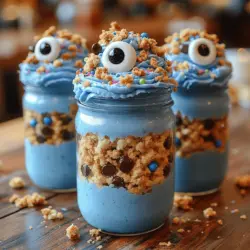
Imagine opening a jar to reveal layers of vibrant blue cake, rich chocolate chips, and fluffy frosting that mimic the beloved Cookie Monster from Sesame Street. The Whimsical Cookie Monster Cake Jars are not just a treat for your taste buds; they are a feast for the eyes and a delightful nod to a cherished childhood character. This fun dessert, perfect for birthdays, themed parties, or simply a whimsical indulgence, combines nostalgic flavors with playful presentation.
In today’s dessert landscape, presentation is as important as flavor. The Cookie Monster Cake Jars elevate any occasion with their colorful aesthetics and charming appeal. They capture the spirit of fun and creativity that dessert should embody, making them an excellent choice for gatherings of all ages. Whether you’re a parent hosting a children’s party or an adult looking to relive some childhood magic, these cake jars are sure to impress. Expect a delicious, colorful dessert that satisfies both the young and the young at heart.
This article will guide you through the exciting process of creating your own Whimsical Cookie Monster Cake Jars. You’ll discover the inspiration behind this delightful treat, a breakdown of the essential ingredients, and the initial steps to bring this dessert to life.
Understanding the Inspiration Behind the Cookie Monster Cake Jars
The Cookie Monster character, with his bright blue fur and insatiable love for cookies, has been a fixture of children’s television since he first appeared on Sesame Street in 1969. He embodies joy, curiosity, and, above all, a love for cookies. The character’s playful antics and humorous obsession have made him a beloved icon across generations, and his influence extends beyond the screen into the realm of culinary creativity.
The rise of themed desserts in modern baking reflects a broader trend towards nostalgia in contemporary cuisine. As people seek to reconnect with their childhood favorites, bakers and dessert enthusiasts are crafting treats that evoke fond memories. The Cookie Monster Cake Jars tap into this sentiment, combining the whimsical nature of the character with flavors that people adore. These jars represent not just a dessert, but a celebration of childhood joys and a playful approach to baking that resonates with everyone.
In recent years, themed desserts have gained immense popularity on social media platforms, where visually striking treats can quickly capture attention. The Cookie Monster Cake Jars fit perfectly within this trend, offering a visually appealing and Instagram-worthy dessert. Their unique presentation makes them ideal for sharing, and they are sure to make a splash at any event.
Ingredients Breakdown
Creating the Whimsical Cookie Monster Cake Jars requires a selection of key ingredients, each playing an important role in achieving the perfect flavor and texture. Let’s break down each ingredient to understand its significance in this delightful dessert.
All-Purpose Flour
All-purpose flour serves as the foundation of the cake, providing the necessary structure and stability. Its protein content allows the cake to rise and maintain its form, ensuring that each layer holds up when assembled in the jar. Choosing the right flour is crucial, as it influences the overall texture of the cake.
Baking Powder and Baking Soda
These leavening agents are essential for achieving a light and fluffy cake. Baking powder is a double-acting agent that releases carbon dioxide when moistened and heated, helping the cake rise. Meanwhile, baking soda, a base, reacts with acidic ingredients like buttermilk to produce additional lift. Together, they create the perfect balance for a tender cake that won’t deflate.
Unsalted Butter
Unsalted butter contributes not only to the flavor of the cake but also to its moisture content. The richness of the butter enhances the overall taste, while its fat content helps create a tender crumb. Using unsalted butter allows for better control over the overall saltiness of the cake, making it easier to achieve the desired flavor profile.
Granulated Sugar
Granulated sugar serves multiple purposes in this recipe. It not only sweetens the cake but also helps with texture and moisture retention. Sugar creates a tender structure by interfering with gluten formation in the flour, resulting in a softer cake. Additionally, it contributes to browning during baking, giving the cake a lovely golden hue.
Eggs
Eggs act as a binding agent, helping to hold the ingredients together and providing structure to the cake. They also add richness and moisture, contributing to the overall flavor profile. The protein in eggs coagulates during baking, helping the cake maintain its shape and providing that signature fluffiness.
Vanilla Extract
Vanilla extract is a key flavor enhancer in this recipe. It adds depth and warmth to the cake, elevating the overall taste experience. Using pure vanilla extract rather than imitation vanilla ensures a more authentic flavor, making each bite of cake even more delightful.
Buttermilk
Buttermilk is a secret weapon in baking, known for its ability to add tanginess and moisture. The acidity in buttermilk interacts with baking soda to create a tender crumb, while also enhancing the cake’s flavor. If you don’t have buttermilk on hand, you can easily make a substitute by mixing milk with a tablespoon of vinegar or lemon juice.
Blue Food Coloring
To create the iconic Cookie Monster color, blue food coloring is essential. It transforms the cake batter into a vibrant blue hue that captures the essence of the character. When using food coloring, it’s important to choose a gel or paste version for better results, as they provide more intense color without altering the batter’s consistency.
Chocolate Chip Cookies
No Cookie Monster-inspired dessert would be complete without chocolate chip cookies! These crumbles add texture and flavor, creating a delicious contrast against the soft cake layers. You can use store-bought cookies or make your own, depending on your preference and time constraints. Either way, the chocolatey goodness will enhance the overall experience of the cake jars.
Blue Frosting
Finally, the blue frosting serves as the eye-catching topping that completes the look of the Cookie Monster Cake Jars. This fluffy, sweet frosting not only adds visual appeal but also complements the cake’s flavor. When decorating, you can use a piping bag to create fun swirls or dollops that mimic the character’s wild hair, making the dessert even more whimsical.
In the next part of this article, we will dive into the detailed steps for assembling your Whimsical Cookie Monster Cake Jars, helping you create this fun and delicious dessert that is sure to impress. Stay tuned for the exciting journey into baking!

Edible Eyes and Sprinkles: Decorative Elements That Enhance the Whimsical Theme
The finishing touches on your Cookie Monster Cake Jars are crucial for achieving that playful, whimsical look that makes these desserts so delightful. Edible eyes, which can be found in baking supply stores or online, are the perfect touch to give your cake jars a lively expression reminiscent of the beloved Cookie Monster character. You can use a mix of large and small edible eyes to create variety and make each jar unique.
Sprinkles play a vital role in enhancing the visual appeal as well. Choose vibrant blue sprinkles to mimic the Cookie Monster’s fur, or go for a mix of colors such as gold, white, or other shades for a fun, confetti-like effect. The right combination of edible eyes and sprinkles will ensure your cake jars don’t just taste amazing but also look stunning, capturing the attention of everyone at your gathering.
Step-by-Step Guide to Making Cookie Monster Cake Jars
Preheating the Oven: Importance of This Step for Optimal Baking
Before starting on your cake batter, preheat your oven to 350°F (175°C). This step is crucial because it ensures that the oven reaches the right temperature for baking, promoting even cooking and rising of your cake. An adequately preheated oven helps create a fluffy texture, while a cold oven can lead to uneven baking or a dense cake. Make sure to allow at least 15-20 minutes for the oven to heat thoroughly before you place your cake in.
Preparing the Cake Batter: Techniques for Achieving the Perfect Texture
For the Cookie Monster Cake, start by gathering your ingredients: all-purpose flour, sugar, baking powder, salt, eggs, milk, vegetable oil, and vanilla extract. In a large mixing bowl, combine the dry ingredients first — flour, sugar, baking powder, and salt. Whisk them together until evenly mixed. In a separate bowl, whisk together the wet ingredients (eggs, milk, vegetable oil, and vanilla extract) until smooth.
To achieve the perfect batter texture, it’s essential to combine the wet and dry ingredients gently. Pour the wet ingredients into the dry mixture and stir with a spatula or wooden spoon just until combined. Be careful not to overmix, as this can lead to a tough cake. A few lumps are perfectly fine; your goal is to have a homogenous batter without gluten overdevelopment.
Combining Wet Ingredients: Tips for Ensuring Smooth Integration Without Overmixing
As you combine the wet and dry ingredients, consider using a folding technique. This involves gently lifting and turning the batter to mix it without stirring too vigorously. This method prevents the formation of gluten, which can make your cake chewy instead of light and fluffy. After combining, if you’re feeling adventurous, fold in some chocolate chips or crushed cookies for added texture and flavor.
Baking the Cake: How to Check for Doneness and Cooling Tips
Once your batter is ready, pour it evenly into prepared cake pans. For this Cookie Monster Cake recipe, you may use two 8-inch round cake pans or a larger 9×13-inch pan, depending on your preference. Bake in the preheated oven for 25-30 minutes, or until a toothpick inserted into the center comes out clean or with a few moist crumbs.
Once baked, remove the cake from the oven and allow it to cool in the pans for about 10 minutes. Then, transfer the cakes to a wire rack to cool completely. Cooling is essential for preventing a soggy bottom when layering your cake jars.
Creating the Blue Frosting: Achieving the Perfect Consistency and Color
While your cakes cool, prepare the blue frosting. In a mixing bowl, beat together softened butter and confectioners’ sugar until light and fluffy. Gradually add milk and vanilla extract to achieve a creamy consistency. To create the signature Cookie Monster blue color, add gel food coloring a little at a time until you reach your desired shade. Gel food coloring is recommended over liquid food coloring as it provides a more vibrant color without altering the frosting’s consistency.
If your frosting appears too thick, add a splash more milk; if it’s too thin, add a bit more powdered sugar. The goal is to have a smooth, spreadable frosting that holds its shape when piped.
Layering the Cake Jars: Best Practices for Even Layering and Presentation
Now comes the fun part: assembling the cake jars! Start by crumbling the cooled cake into small pieces. Using a spoon or a small scoop, layer the crumbled cake into the bottom of each jar. Follow with a layer of blue frosting. Use a piping bag or a plastic sandwich bag with the corner snipped off for clean application. Alternate layers of cake and frosting until you reach the top of the jar, finishing with a generous swirl of frosting.
To achieve a neat and attractive presentation, ensure each layer is even. Tap the jars gently on the counter to settle the layers, and use a small offset spatula to smooth the frosting on top. This will ensure your Cookie Monster Cake Jars are not only delicious but also visually appealing.
Final Touches: Creative Decoration Ideas to Elevate the Jars
After layering, it’s time to get creative with the decorations. Sprinkle a generous handful of blue sprinkles on top of the frosting to give it that fur-like quality. Add edible eyes to mimic the Cookie Monster’s playful expression, positioning them slightly above the frosting to create a 3D effect. For an extra fun twist, place mini chocolate chip cookies on top or use cookie halves as “ears.” These finishing touches will not only enhance the whimsical theme but also invite your guests to dig in!
Serving Suggestions and Occasions
Cookie Monster Cake Jars are perfect for various occasions. They can be a delightful centerpiece at birthday parties, bringing smiles to both kids and adults alike. Their playful appearance and delicious taste make them a hit at family gatherings, holiday celebrations, and even casual get-togethers with friends.
Additionally, these cake jars make fantastic gifts or party favors. Layer them in mason jars, tie with colorful ribbons, and attach a cute note for a personal touch. Not only are they visually appealing, but they also allow for easy transport and serving, making them a practical option for any occasion.
Consider pairing your Cookie Monster Cake Jars with beverages such as milk, hot cocoa, or even a light fruit punch. For dessert pairings, they can complement vanilla ice cream or a scoop of chocolate mousse, creating a delightful dessert platter that will impress your guests.
Nutritional Information and Variations
Each individual serving of a Cookie Monster Cake Jar provides approximately 350-400 calories, depending on the exact ingredients used and portion sizes. This includes a balance of carbohydrates from the cake, fats from the frosting, and a small amount of protein from the eggs. For those looking to make modifications, consider using whole wheat flour for added fiber, or substitute a sugar alternative to reduce calories.
If you or your guests have dietary restrictions, you can easily adapt this recipe. For a gluten-free version, replace the all-purpose flour with a gluten-free flour blend. Additionally, explore alternative frosting flavors such as cream cheese or whipped cream for a lighter option. Incorporating healthier ingredients, such as Greek yogurt in the frosting or using applesauce instead of oil in the cake, can also create a lighter dessert without sacrificing flavor.
Conclusion
Crafting Cookie Monster Cake Jars is not just about creating a dessert; it’s about bringing joy and whimsy to your celebrations. This delightful recipe allows you to experiment with layers, flavors, and decorations to personalize each jar, making it a unique creation every time you bake. The process of making these cake jars— from baking the fluffy blue cake to layering and decorating— is an enjoyable experience that can be shared with family and friends.
Encourage yourself to explore different variations and make this recipe your own. The impact of whimsical desserts like these on your gatherings cannot be overstated; they spark joy and create lasting memories. So, gather your ingredients, unleash your creativity, and dive into the delicious world of Cookie Monster Cake Jars. Happy baking!