Spooktacular Halloween Candy Bark: A Fun and Festive Treat
As the leaves begin to change color and the crisp autumn air settles in, the excitement of Halloween approaches. This whimsical holiday is not only a time for costumes and spooky decorations but also a celebration filled with delightful treats that capture the spirit of the season. Among the many festive confections that grace our tables, Halloween candy bark stands out as a simple yet delicious option that not only tantalizes the taste buds but also sparks creativity in the kitchen.
During the busy Halloween season, easy and enjoyable recipes become invaluable. Candy bark is the perfect solution, allowing both novice and seasoned bakers to create a visually appealing and delectable treat without the need for intricate techniques or specialized equipment. The beauty of candy bark lies in its versatility; it can be tailored to suit various tastes and dietary preferences, making it a crowd-pleaser for parties, gatherings, or even as a thoughtful homemade gift.
So, what exactly is candy bark? At its core, candy bark consists of a layer of melted chocolate topped with a delightful assortment of candies, nuts, and other fun ingredients. The resulting treat is not only delicious but also a visual feast, with vibrant colors and textures that evoke the playful spirit of Halloween. Whether you choose to indulge in classic flavors or experiment with unique combinations, the possibilities are endless.
In this recipe, we will explore how to create a spooktacular Halloween candy bark using a blend of white and milk chocolate, an array of seasonal candies, and festive decorations. Gather your favorite treats, and get ready to whip up a batch of this inviting confection that will surely delight friends and family alike.
The Allure of Halloween Candy Bark
Candy bark is a favorite among many for its simple preparation and endless customization options. This versatile treat can easily accommodate a variety of tastes, making it an ideal dessert for gatherings where guests may have different preferences. It can be made gluten-free, dairy-free, or even vegan by selecting the appropriate chocolate and toppings, ensuring that everyone can partake in the festivities.
One of the most appealing aspects of Halloween candy bark is its visual charm. The vibrant colors of candy corn, the playful shapes of gummy worms, and the sparkle of Halloween-themed sprinkles all come together to create a stunning treat that is perfect for display. Placed on a festive platter or packaged in a decorative box, candy bark makes for an excellent centerpiece at Halloween parties and a delightful gift for neighbors and friends.
Gathering Your Ingredients
Before diving into the fun of making Halloween candy bark, it’s essential to gather all the necessary ingredients. This will ensure a smooth and enjoyable baking experience. Here’s a detailed overview of the main components you’ll need:
1. White Chocolate Chips: Start with high-quality white chocolate chips that will melt smoothly and create a creamy base for your candy bark. Look for brands that have a high cocoa butter content for the best results. When melting white chocolate, be mindful of the temperature, as it can seize if overheated.
2. Milk Chocolate Chips: The addition of milk chocolate provides a rich contrast to the sweetness of white chocolate. Choose a good-quality milk chocolate to ensure a satisfying flavor. As with the white chocolate, melting it properly is key to achieving a smooth texture.
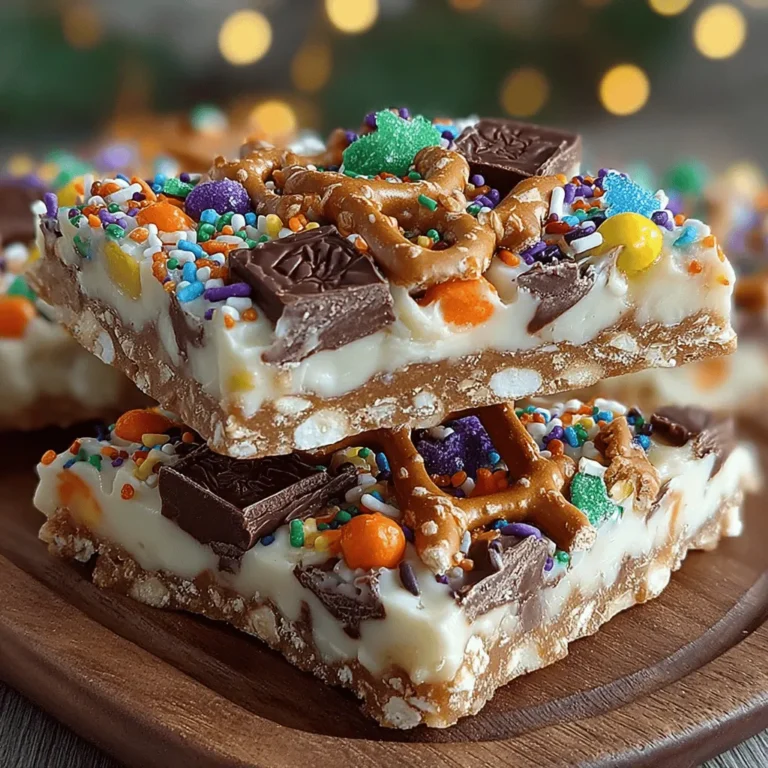
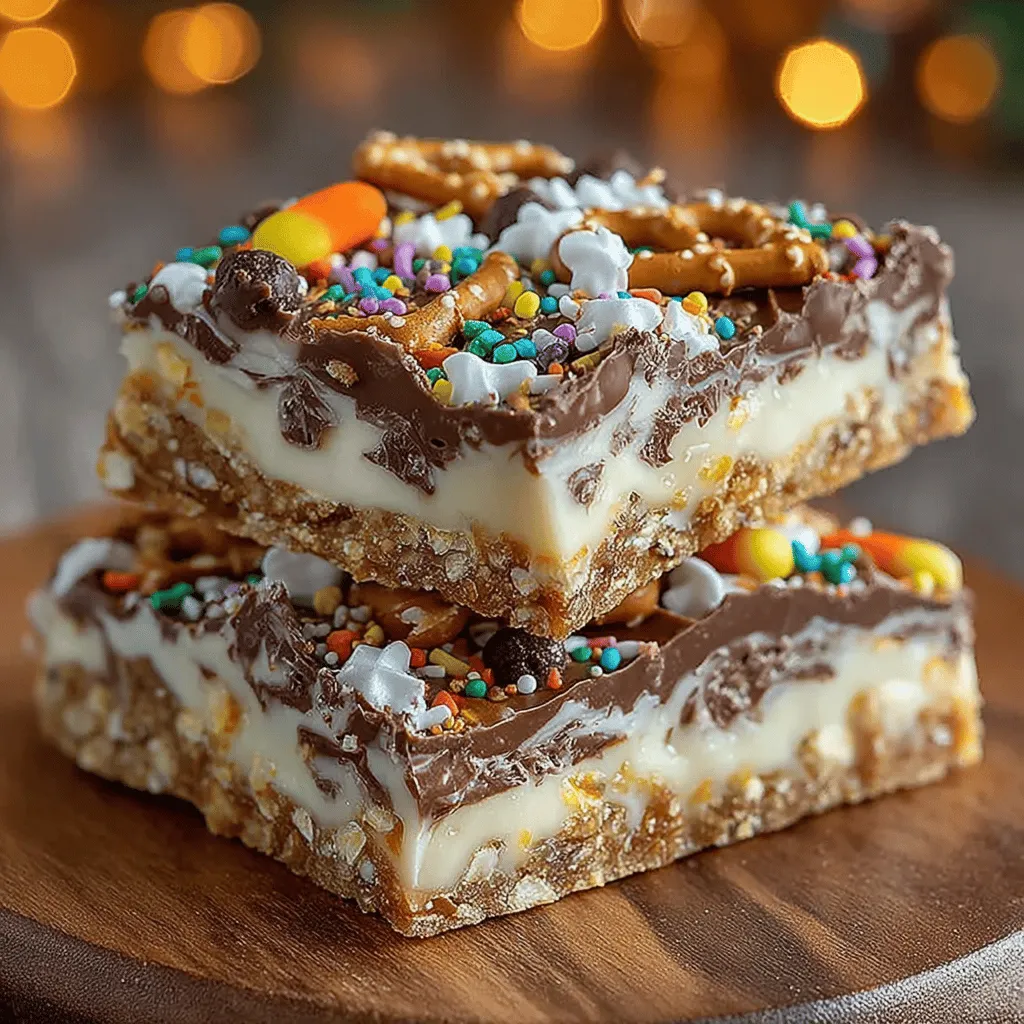
3. Halloween Candy: This is where the fun truly begins! Select a variety of Halloween-themed candies to sprinkle on top of your bark. Popular choices include candy corn, mini chocolate bars, gummy worms, and even colorful M&M’s. Not only do these candies add flavor, but they also contribute to the festive look of your treat.
4. Pretzel Pieces: Adding pretzel pieces introduces a delightful crunch and a touch of saltiness that balances the sweetness of the chocolate and candy. Crushed pretzels can be scattered on top or mixed into the chocolate layer for added texture.
5. Nuts (Optional): Consider including nuts like chopped pecans, walnuts, or almonds for an extra layer of flavor and crunch. If you’re catering to nut allergies, you can easily omit this ingredient.
6. Halloween-themed Sprinkles: To enhance the festive appeal, don’t forget to add some Halloween-themed sprinkles. These tiny decorations can elevate the look of your candy bark, making it even more enticing.
Step-by-Step Instructions for Making Halloween Candy Bark
Now that you have all your ingredients ready, it’s time to get started on this delightful Halloween candy bark. Follow these simple steps to ensure your candy bark turns out perfectly:
Preparing Your Workspace:
– Begin by clearing and organizing your kitchen counter. A clean workspace will not only help you stay focused but also make the cleanup process much easier.
– Line a baking sheet with parchment paper or a silicone baking mat. This step is crucial, as it prevents the chocolate from sticking and allows for easy removal once the bark is set.
Melting the White Chocolate:
– Place the white chocolate chips in a microwave-safe bowl. Microwave in short intervals of 20-30 seconds, stirring in between, until the chocolate is completely melted. Be careful not to overheat, as white chocolate can burn quickly.
– You’ll know the chocolate is ready when it’s smooth and glossy, without any lumps remaining.
Spreading the White Chocolate:
– Once melted, pour the white chocolate onto the prepared baking sheet and use a spatula to spread it into an even layer. Aim for about a quarter-inch thickness to ensure the bark holds together well after it’s cooled.
With this initial preparation complete, you’re well on your way to creating a delightful Halloween treat that will impress all who indulge. Stay tuned for the next steps, where we’ll dive into layering the milk chocolate, adding your favorite candies, and finishing touches that will make your Halloween candy bark truly spooktacular!
Creating Spooktacular Halloween Candy Bark is a delightful way to celebrate the season while indulging your sweet tooth. This candy bark is not only easy to make but also allows for endless creativity with toppings and decorations. Let’s delve into the techniques and tips for crafting the perfect Halloween candy bark, ensuring it stands out at any Halloween gathering.
Techniques for Achieving an Even Layer
Achieving an even layer of chocolate is essential for the best texture and appearance of your candy bark. To create a smooth surface, start by preparing a baking sheet lined with parchment paper or a silicone mat. The non-stick surface will help you easily lift the bark once it’s set.
When pouring your melted chocolate onto the baking sheet, use a spatula to spread it evenly. Start from the center and work your way outwards, applying gentle pressure to avoid creating air bubbles. Tilt the baking sheet slightly to help the chocolate spread evenly across the surface. If needed, tap the baking sheet gently on the counter to settle the chocolate into a smooth layer.
Thickness of the Layer for Optimal Texture
The thickness of your chocolate layer can greatly influence the texture and taste of your candy bark. A thickness of 1/4 to 1/2 inch is ideal. This thickness strikes a balance between being sturdy enough to hold toppings without becoming too thick or difficult to bite into. If you prefer a more fragile bark that melts in your mouth, aim for a thinner layer closer to 1/4 inch. Conversely, if you want a heartier treat, a thicker layer up to 1/2 inch will work well.
Melting and Drizzling the Milk Chocolate
Melting chocolate is a key step in the process of making candy bark. For milk chocolate, you have a couple of options: the microwave or a double boiler.
Similarities and Differences in Melting Techniques for Milk Chocolate
When using the microwave, place your chopped chocolate in a microwave-safe bowl and heat in short intervals of 15 to 30 seconds, stirring between each interval. This prevents overheating, which can cause the chocolate to seize.
In contrast, using a double boiler involves placing a heatproof bowl over a pot of simmering water. This method allows for more controlled melting and is less likely to burn the chocolate. Regardless of the method, the goal is to reach a smooth, pourable consistency.
Achieving a Beautiful Marbled Effect
To create a stunning marbled effect with white chocolate, melt both milk and white chocolate separately. After pouring the milk chocolate onto the prepared baking sheet, drizzle melted white chocolate on top. Use a toothpick or a skewer to swirl the two chocolates together gently. Be careful not to overmix, as you want to maintain distinct swirls of both colors for visual appeal.
Adding Toppings
The toppings you select for your Halloween candy bark can transform it from simple to spectacular.
Evenly Distributing Toppings for Flavor Balance
When adding toppings, it’s crucial to distribute them evenly to ensure each bite has a balanced flavor. Sprinkle toppings such as crushed candy corn, Halloween-themed sprinkles, pretzel pieces, or nuts evenly across the melted chocolate before it sets. This not only enhances the flavor but also adds texture to your bark.
Importance of Pressing Toppings into the Chocolate
After sprinkling your toppings, lightly press them into the melted chocolate. This step helps the toppings adhere better once the chocolate hardens, ensuring they don’t fall off when you break the bark into pieces. A gentle press with your fingers or the back of a spatula works well for this purpose.
Decorating
Decorating your candy bark is where your creativity can truly shine.
Creative Ideas for Sprinkles
Consider using themed sprinkles like ghosts, pumpkins, or bats to enhance the Halloween spirit. You can also use colored sugar or edible glitter for an eye-catching finish. These small details can significantly impact the overall presentation of your bark.
Suggestions for Color Themes and Combinations
Choosing a color theme can unify your Halloween candy bark. Classic combinations like orange and black or purple and green are popular during the Halloween season. Consider alternating layers of chocolate for additional color variation or incorporating colored drizzle on top.
Chilling and Setting the Candy Bark
Once your toppings are added, it’s time to let the chocolate set.
Why Chilling is Necessary for the Chocolate to Set Properly
Chilling is essential for allowing the chocolate to harden and maintain its shape. This process ensures the bark won’t be too soft when you break it into pieces.
Recommended Chilling Time and Alternative Methods
Place your baking sheet in the refrigerator for about 30 to 60 minutes, depending on the thickness of your layer. If you’re short on time, you can also set the candy bark in the freezer for about 15 to 20 minutes, but be cautious not to leave it too long, or it may become too hard.
Breaking and Serving the Candy Bark
Once your candy bark is set, it’s time to break it into pieces and serve!
Techniques for Breaking the Bark into Appealing Pieces
To break the bark, lift it from the parchment paper and place it on a cutting board. Use a sharp knife to score the bark into squares or rectangles, then break it apart with your hands. For a more rustic look, you can break it randomly into irregular pieces, which can add to its charm.
Presentation Ideas
Arranging on Platters
For serving, arrange the pieces on a decorative platter, layering them attractively to show off their colorful toppings. You can also use themed serving dishes or cake stands to elevate the presentation.
Using Treat Bags for Gifting
If you’re planning to share your candy bark, consider placing it in treat bags tied with festive ribbons. This makes for a delightful gift for friends, family, or classmates. You can also attach a small tag with the recipe for a personal touch.
Suggestions for Pairing with Other Halloween Treats
Your Spooktacular Halloween Candy Bark pairs wonderfully with other Halloween treats. Consider serving it alongside popcorn balls, caramel apples, or homemade cookies for a festive dessert table that appeals to both kids and adults alike.
Conclusion
Making Spooktacular Halloween Candy Bark is a fun and simple way to celebrate the holiday with friends and family. The process allows for plenty of creativity, from selecting your favorite chocolates to arranging colorful toppings, making it an enjoyable activity for everyone involved.
This candy bark not only serves as a delicious treat but also enhances the festive atmosphere of any Halloween gathering. So, gather your ingredients, unleash your creativity, and enjoy the joy of sharing homemade treats during this spooky season. Whether you stick to traditional flavors or personalize your bark with unique toppings, the possibilities are endless. Happy Halloween!
