Introduction to Fluffy Herb-Infused Focaccia
As the aroma of freshly baked bread fills your kitchen, few things can rival the satisfaction of creating your own loaf from scratch. Among the many types of bread, focaccia stands out for its unique texture and flavor profile. Characterized by a crispy golden crust and a soft, airy interior, Fluffy Herb-Infused Focaccia is the perfect introduction to the world of homemade bread. This Italian classic is not just a treat for the taste buds; it is a canvas for culinary creativity, inviting you to explore various toppings and flavor infusions.
This article will guide you through the step-by-step process of making your own Fluffy Herb-Infused Focaccia at home. You’ll discover the importance of each ingredient and technique, ensuring a perfect bake every time. Whether enjoyed as a simple snack, served alongside your favorite pasta dish, or transformed into a delectable sandwich, focaccia is a versatile addition to any meal.
Understanding Focaccia
Defining Focaccia: A Brief History
Focaccia has a storied history that dates back to ancient Roman times. The name itself is derived from the Latin word “focus,” which means “hearth” or “fireplace.” Originally, this flatbread was baked on hot stones or in the ashes of a wood fire, giving it a rustic charm that has persisted through the centuries. Traditionally, focaccia was made with just a few basic ingredients: flour, water, salt, and olive oil. However, as Italian cuisine evolved, so too did focaccia, with regional variations emerging that incorporated local ingredients and flavors.
In Liguria, the birthplace of focaccia, it is often topped with olive oil and sea salt, while other regions have adapted the bread to include a variety of toppings such as herbs, vegetables, cheeses, and cured meats. Today, focaccia is celebrated not only in Italy but around the world, adored for its simplicity and versatility.
Culinary Versatility of Focaccia
One of the most appealing aspects of focaccia is its culinary versatility. This bread can be served in numerous ways, making it an ideal addition to any meal. Whether you enjoy it as a side dish alongside a hearty soup, use it as a base for a gourmet sandwich, or serve it as an appetizer with dips and spreads, focaccia adapts beautifully to any occasion.
Focaccia can be made with an array of flavor profiles, allowing for endless creativity. You can experiment with fresh herbs like rosemary or thyme, incorporate roasted garlic for a savory kick, or even top it with seasonal vegetables such as cherry tomatoes or olives. The possibilities are truly limitless, making focaccia a beloved staple in many kitchens.
Ingredients Breakdown
Essential Ingredients for Fluffy Focaccia
To create the perfect Fluffy Herb-Infused Focaccia, it’s essential to understand the role of each ingredient in the recipe. Here’s a detailed breakdown:
– All-Purpose Flour: This is the backbone of your focaccia. All-purpose flour contains a moderate amount of gluten, which is vital for the structure and texture of the bread. The gluten development during kneading allows the dough to rise and creates that signature chewy bite.
– Sea Salt: Beyond enhancing flavor, salt plays a crucial role in controlling yeast activity. It strengthens the gluten network, ensuring a better rise and a more flavorful loaf. Using sea salt can also impart a subtle briny taste that elevates your focaccia.
– Sugar: While it may seem like an optional ingredient, sugar is important for yeast activation. It feeds the yeast, promoting fermentation and contributing to the dough’s rise. A small amount of sugar can also enhance the browning of your focaccia, giving it a beautiful golden crust.
– Active Dry Yeast: This is your leavening agent, responsible for making the dough rise. Active dry yeast must be activated with warm water, allowing it to bloom and develop the gases needed for leavening. The result is a light and airy texture.
– Warm Water: The temperature of the water is crucial for yeast activation. Ideally, it should be between 100°F to 110°F (37°C to 43°C). Water that is too hot can kill the yeast, while water that is too cold may not activate it effectively, hindering the rise of your dough.
– Olive Oil: An essential ingredient in Italian cooking, olive oil contributes to the flavor and texture of your focaccia. It adds moisture to the dough, creating a tender crumb, and enhances the overall richness of the bread. Additionally, drizzling olive oil on top before baking helps achieve that crispy exterior.
– Fresh Herbs: Using fresh herbs not only infuses your focaccia with vibrant flavors but also adds a visual appeal. Herbs like rosemary, basil, and thyme can be incorporated into the dough or sprinkled on top before baking. Fresh herbs provide a more potent flavor compared to dried, making them the preferred choice for this recipe.
– Toppings: While the base of focaccia is delicious on its own, toppings can take it to the next level. Consider adding ingredients like cherry tomatoes, olives, or roasted garlic for extra flavor and texture. You can also experiment with different cheeses or even a sprinkle of sea salt for added crunch.
Step-by-Step Instructions
Activating the Yeast: The Foundation of Your Dough
The first step in creating your Fluffy Herb-Infused Focaccia involves activating the yeast. This step is crucial as it sets the foundation for your dough. Begin by measuring out warm water in a bowl. Ensure that the water temperature is within the optimal range of 100°F to 110°F. If you do not have a thermometer, you can test it by touching the water; it should feel warm but not hot to the touch.
Once you have the warm water, stir in the sugar and active dry yeast. Allow this mixture to sit undisturbed for about 5 to 10 minutes. During this time, you should notice bubbles forming on the surface, indicating that the yeast is alive and active. This step is vital; if your yeast does not bubble, it may be inactive, and you will need to start over with fresh yeast.
Combining the Dry Ingredients: Achieving the Right Texture
While your yeast is activating, you can prepare the dry ingredients. In a large mixing bowl, combine the all-purpose flour and sea salt. It’s important to mix these dry ingredients thoroughly before adding the yeast mixture. This ensures that the salt is evenly distributed throughout the flour, preventing any clumping.
Once the dry ingredients are well mixed, create a well in the center of the flour mixture. This is where you will pour in your activated yeast mixture and olive oil. The well helps incorporate the wet ingredients into the dry ingredients more easily, creating a uniform dough.
As you combine the ingredients, the dough will begin to come together. You may find it helpful to use a wooden spoon or your hands to mix everything until no dry flour remains. The goal is to achieve a shaggy dough that feels slightly sticky but manageable. This initial mixing is crucial for developing the gluten structure that will give your focaccia its characteristic chewiness.
With this foundation laid, you’re well on your way to creating a delicious loaf of Fluffy Herb-Infused Focaccia. As we continue, we will delve deeper into the kneading process, fermentation, and baking techniques that will ensure your focaccia turns out perfect every time. Stay tuned for the next steps in this culinary journey.
Creating the Dough: Techniques for Success
When it comes to making fluffy herb-infused focaccia, the dough preparation phase is crucial. Proper kneading ensures a well-developed gluten structure, which is essential for trapping air bubbles and creating that signature lightness. There are two primary methods for kneading dough: hand-kneading and using a stand mixer.
Hand-Kneading: This traditional method allows you to feel the dough’s texture as you work with it. Start by combining your flour, water, yeast, and salt in a large bowl. Transfer the mixture to a clean surface and begin kneading by folding the dough over itself and pushing it down with the heel of your hand. Rotate the dough a quarter turn after each fold. Knead for about 8-10 minutes until the dough becomes smooth and elastic. This method not only builds muscle but also enhances your connection with the bread-making process.
Using a Stand Mixer: If you prefer a more hands-off approach, a stand mixer equipped with a dough hook is an excellent alternative. Combine your ingredients in the bowl of the mixer and mix on low speed until the dough starts to come together. Gradually increase the speed to medium and knead for about 5-7 minutes. The dough should pull away from the sides of the bowl and form a cohesive ball. This method is less labor-intensive and is perfect for those who may have physical limitations or simply want to save time.
First Rise: Understanding Fermentation
Once your dough is kneaded to perfection, it’s time for the first rise, also known as fermentation. During this phase, the yeast begins to work, feeding on the sugars in the flour and producing carbon dioxide and alcohol. This process not only helps the dough rise but also develops its flavor.
You’ll know your dough is ready when it has roughly doubled in size. A good visual cue is to lightly poke the dough; if the indentation remains and doesn’t spring back immediately, it’s a sign that your dough has fermented properly. The ideal temperature for the dough to rise is around 75-80°F (24-27°C), so if your kitchen is cool, consider placing the bowl in a warm, draft-free area or covering it with a damp cloth to maintain warmth.
Shaping the Dough: Perfecting the Focaccia Form
After the first rise, it’s time to shape your focaccia. Be gentle during this process to avoid deflating the air pockets that have formed. Start by turning the risen dough out onto a lightly floured surface. Use your fingers to gently stretch the dough into a rectangle or circle, depending on your preference. Aim for a thickness of about 1 inch.
To maintain the airy structure, avoid using a rolling pin, which can compress the dough. Instead, use your hands to carefully stretch and press. If the dough resists, let it rest for a few minutes before continuing to shape. Once you achieve your desired thickness, gently transfer the dough to a greased baking tray or cast-iron skillet, allowing it to relax and settle into the pan.
Second Rise: The Importance of Patience
The second rise is a critical step that will elevate your focaccia from good to extraordinary. During this phase, the dough has the chance to rise again, giving it an even fluffier texture. Cover the shaped dough with a clean kitchen towel and let it rise for an additional 30-45 minutes.
While the dough rises, it’s important to keep an eye on it. Look for visible expansion; the dough should puff up and feel airy to the touch. This step is about patience, so resist the urge to rush. The longer it rests, the more flavor develops, and the fluffier your final product will be.
Preheating the Oven: Setting the Stage for Baking
As the dough undergoes its second rise, start preheating your oven to 425°F (220°C). Preheating is crucial for an even bake, ensuring that your focaccia has a beautiful golden crust and soft interior. An adequately heated oven also helps achieve that signature crispiness on the exterior while keeping the inside fluffy.
Consider placing a baking stone or an inverted baking sheet in the oven during preheating. This can help retain heat and create steam, which contributes to a better crust.
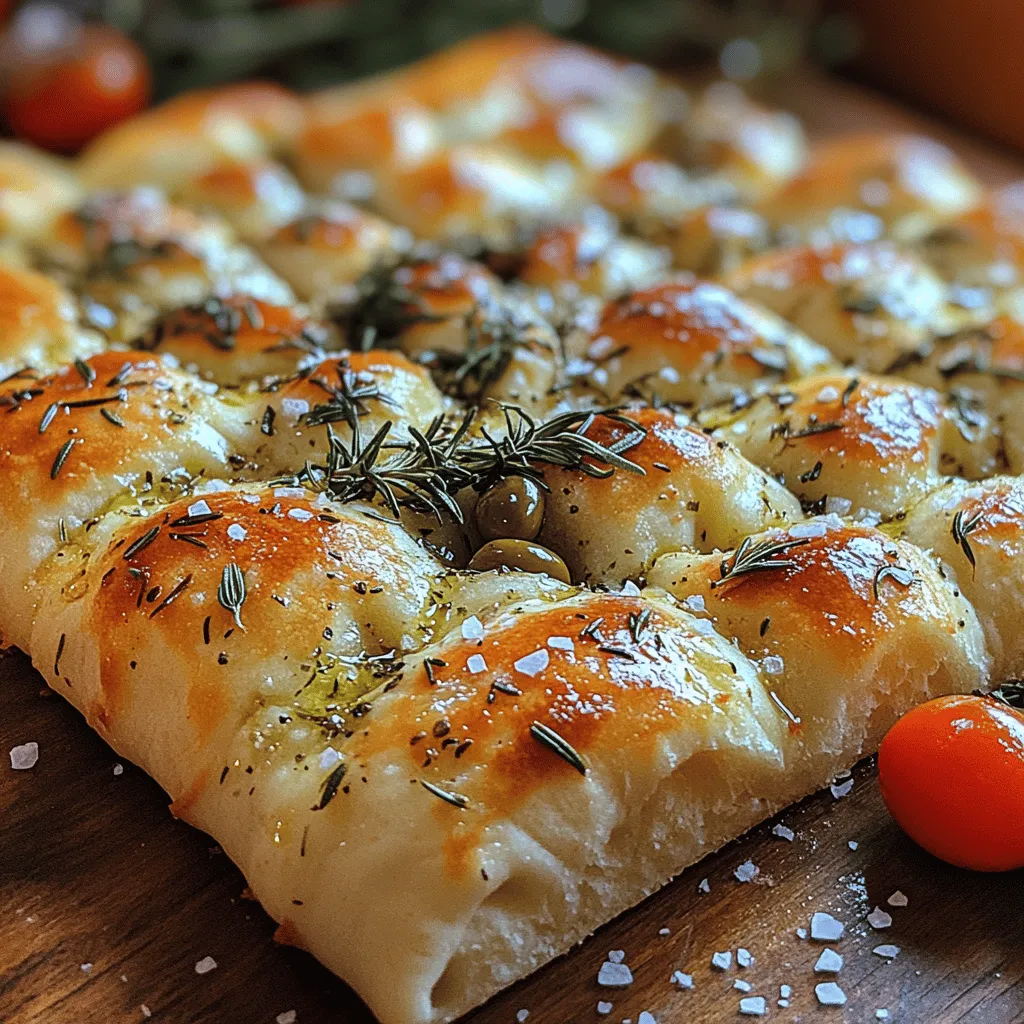
Adding Toppings: Customizing Your Focaccia
One of the joys of making focaccia is the opportunity to customize it with an array of toppings. While traditional options include rosemary and sea salt, the possibilities are endless. You can use fresh herbs like thyme, oregano, or basil, as well as toppings such as sun-dried tomatoes, olives, or caramelized onions.
Before adding your toppings, use your fingertips to create dimples in the risen dough. This not only adds texture but also creates small pockets for the toppings to nestle into. Drizzle a generous amount of olive oil over the surface, followed by a sprinkle of sea salt. Then, layer on your chosen toppings, being careful not to overcrowd the dough, which could lead to sogginess.
Baking: Achieving the Perfect Golden Brown
With your focaccia ready for the oven, it’s time to bake. Place the tray or skillet in the preheated oven and bake for about 20-25 minutes. Keep an eye on the color; you want the focaccia to turn a deep golden brown. The edges should be crisp, and when you gently tap the bottom of the bread, it should sound hollow—a sure sign that it’s cooked through.
If you find that the top is browning too quickly, you can cover it loosely with aluminum foil to prevent burning while allowing the center to cook thoroughly.
Cooling and Serving: Enhancing the Experience
Once baked to perfection, remove the focaccia from the oven and let it cool in the pan for about 10 minutes before transferring it to a wire rack. This cooling period allows the steam to escape, preventing the bottom from becoming soggy.
Focaccia is incredibly versatile and can be served in various ways. Slice it into squares or wedges and serve it warm with a side of balsamic vinegar and olive oil for dipping. Consider pairing it with a fresh salad, charcuterie board, or as a sandwich base for a delicious lunch option. For an impressive presentation, drizzle a little extra virgin olive oil and sprinkle some flaky sea salt just before serving.
Common Mistakes to Avoid
Baking focaccia can be straightforward, but there are common pitfalls to be aware of.
– Over-Kneading: While developing gluten is essential, over-kneading can lead to a tough texture. If using a stand mixer, be mindful of the time and check the dough’s elasticity regularly.
– Under-Proofing: Skipping the necessary rise times can result in dense, unappealing bread. Always ensure you allow sufficient time for the dough to rise.
– Incorrect Baking Temperature: Baking at too low a temperature can lead to a pale, soft focaccia. Always preheat your oven adequately and check the temperature with an oven thermometer if necessary.
Nutritional Information
Understanding the nutritional value of your homemade focaccia can enhance your appreciation for this delightful bread. On average, a standard serving (about 1/8 of a large focaccia) contains approximately:
– Calories: 220
– Carbohydrates: 35g
– Proteins: 5g
– Fats: 8g
– Sodium: 200mg
Homemade focaccia can be a wonderful addition to your diet, especially when made with high-quality ingredients. The use of olive oil provides heart-healthy fats, while the herbs add valuable antioxidants and flavor.
Conclusion: The Joy of Homemade Focaccia
Making fluffy herb-infused focaccia at home is not just about baking; it’s an experience that brings joy and satisfaction. The process allows for creativity, experimentation with flavors, and the pleasure of enjoying freshly baked bread right from your oven. With its simple ingredients and straightforward techniques, focaccia is an accessible recipe for bakers of all skill levels.
The rewards of this recipe extend beyond the delicious end product; it’s about the aroma that fills your kitchen, the anticipation as you wait for it to rise, and the joy of sharing your creation with family and friends. So, gather your ingredients, roll up your sleeves, and dive into the delightful world of focaccia baking. You’ll be amazed at how easy and fulfilling it is to create this Italian classic, and you might find yourself experimenting with different herbs and toppings for endless variations. Happy baking!