In the world of sweet treats, few delights can compare to the rich, chocolatey goodness of doughnut holes. These decadent chocolate doughnut holes combine the classic indulgence of chocolate with the fun and bite-sized nature of doughnut holes, making them an irresistible treat for any occasion. Whether you’re hosting a celebration, looking for a cozy snack, or simply want to satisfy your sweet tooth, these delightful morsels are sure to impress. In this article, we’ll walk you through the entire process of creating these delightful treats, from gathering ingredients to savoring the final product.
Understanding the Ingredients
Creating perfect chocolate doughnut holes requires a careful selection of ingredients, each playing a crucial role in achieving the desired taste and texture. Below, we delve into the key components that will make your doughnut holes an absolute hit.
All-Purpose Flour: The Foundation of Texture
All-purpose flour is the backbone of many baked goods, including our decadent chocolate doughnut holes. Its importance lies in its ability to provide structure and stability to the dough. When mixed with the other ingredients, flour helps form the gluten that gives the doughnut holes their characteristic chewy texture. For the best results, it’s essential to measure your flour correctly—too much can lead to dense, dry doughnut holes, while too little can result in a crumbly texture.
Cocoa Powder: Infusing Richness
Cocoa powder is what sets chocolate doughnut holes apart from their vanilla counterparts. This unsweetened powder not only provides the rich, deep chocolate flavor that we crave, but it also contributes to the color of the doughnut holes. When choosing cocoa powder, opt for high-quality brands for the best results. The cocoa powder interacts with other ingredients, enhancing the overall flavor profile and creating a decadent experience for your taste buds.
Sweetness Perfected: Granulated Sugar
No dessert is complete without the right amount of sweetness, and granulated sugar is the go-to ingredient for balancing flavors in chocolate treats. In our doughnut hole recipe, sugar plays a vital role in achieving the perfect level of sweetness while also affecting the texture and moisture content. Sugar helps to create a tender crumb by retaining moisture in the baked goods, ensuring that each bite is soft and luscious.
The Leavening Agents: Baking Powder and Baking Soda
To achieve the ideal rise and texture in your doughnut holes, understanding the difference between baking powder and baking soda is essential. Baking powder is a complete leavening agent that contains both an acid and a base, allowing it to create carbon dioxide bubbles when mixed with wet ingredients. This reaction helps the doughnut holes rise and become fluffy. On the other hand, baking soda requires an acid (like buttermilk) to activate. In this recipe, using both ensures a perfect lift and a light texture that melts in your mouth.
Salt: Elevating the Flavor Profile
While it may seem counterintuitive, adding salt to sweet recipes actually enhances the overall flavor profile. A pinch of salt helps to balance the sweetness of the sugar, making the chocolate flavor more pronounced. Salt also plays a role in strengthening the dough, enhancing the overall texture of the doughnut holes. Use good quality salt in moderation to elevate the flavors without overpowering the sweetness.
Buttermilk: The Secret to Moisture
One of the unsung heroes of baking is buttermilk, which introduces moisture and acidity to the doughnut hole mixture. The acidity in buttermilk reacts with baking soda to create a tender crumb, resulting in soft, moist doughnut holes. Additionally, buttermilk adds a subtle tanginess that complements the sweetness, enriching the overall flavor. If you don’t have buttermilk on hand, you can easily make a substitute by mixing regular milk with a splash of vinegar or lemon juice.
Oil vs. Butter: Choosing the Right Fat
When it comes to fats in baking, both oil and butter have their advantages. In our decadent chocolate doughnut holes, we use vegetable oil for a few key reasons. Oil creates a moist and tender texture, while also ensuring that the doughnut holes remain soft even after cooling. While butter adds a rich flavor, it tends to create a firmer texture. The choice of oil in this recipe results in a pillowy bite that is simply irresistible.
Eggs: Binding and Structure
Eggs are a crucial component in baking, serving multiple functions. In our doughnut hole recipe, eggs act as a binding agent, helping to hold the ingredients together. They also contribute to the leavening process, adding moisture and richness to the dough. When beaten, eggs incorporate air, leading to a lighter texture in the final product. Using room temperature eggs can also make a difference in achieving a uniform mixture.
Vanilla Extract: The Flavor Enhancer
Vanilla extract is a staple in many dessert recipes, and for good reason. Its warm and sweet flavor complements the richness of chocolate, enhancing the overall taste of the doughnut holes. When selecting vanilla extract, opt for pure vanilla for the best results, as imitation extracts can lack the depth of flavor needed in a decadent chocolate treat. Just a teaspoon can elevate the flavor profile to new heights.
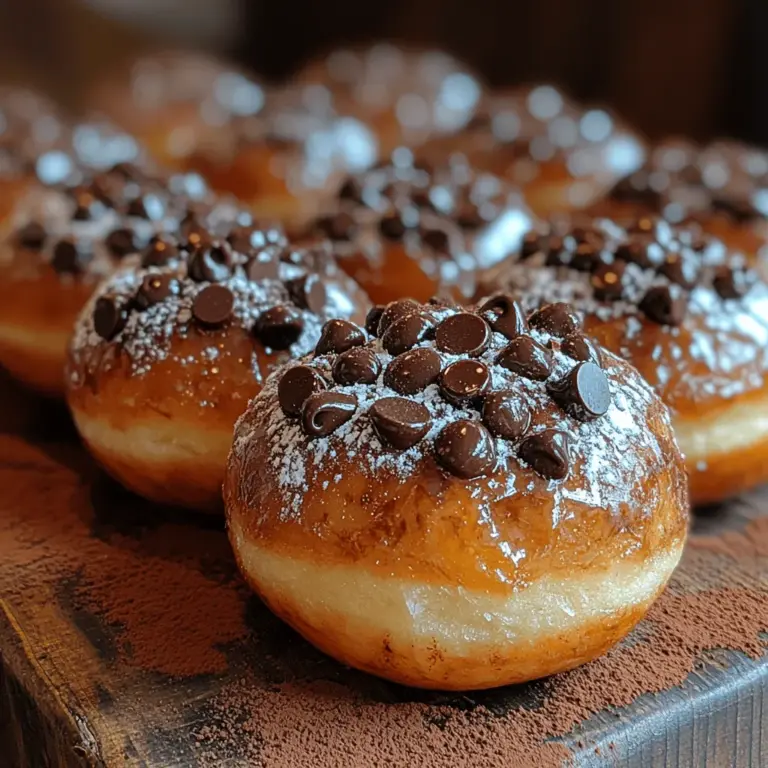
Chocolate Chips: Adding Extra Indulgence
To take our chocolate doughnut holes to the next level, we include semi-sweet chocolate chips in the batter. These little morsels of chocolate not only add an extra burst of flavor but also contribute to the overall texture. As the doughnut holes bake, the chocolate chips melt slightly, creating gooey pockets of chocolate that are simply irresistible. Feel free to experiment with different types of chocolate chips, such as dark or milk chocolate, to suit your taste preferences.
Now that we’ve explored the essential ingredients for our decadent chocolate doughnut holes, it’s time to dive into the initial steps of making this delightful dessert.
Preparing Your Workstation
Before you get started, ensure that your kitchen is well-prepared for the baking process. Gather all your ingredients and measuring tools, and have mixing bowls, a whisk, and a baking tray ready. Preheat your oven to 350°F (175°C) to ensure it reaches the right temperature while you prepare the dough. If you have a doughnut hole pan, grease it lightly with non-stick spray or oil to prevent sticking. If you don’t have a pan, you can use a standard muffin pan with liners, but the doughnut hole pan will yield the classic shape we’re after.
Mixing the Wet Ingredients
Start by combining your wet ingredients in a large mixing bowl. Begin with the buttermilk, adding in the vegetable oil and eggs. Whisk these ingredients together until they are fully incorporated and smooth. The oil should blend seamlessly with the buttermilk and eggs, creating a creamy base for your doughnut holes. You’ll want to make sure there are no lumps at this stage, as a smooth batter translates to a uniform texture in the final product.
Incorporating the Dry Ingredients
In a separate bowl, whisk together the dry ingredients: all-purpose flour, cocoa powder, granulated sugar, baking powder, baking soda, and salt. This step is crucial as it ensures that the leavening agents and cocoa powder are evenly distributed throughout the flour. By mixing the dry ingredients before combining them with the wet ingredients, you’ll avoid clumping and ensure that each doughnut hole is perfectly flavored.
Combining Wet and Dry Mixtures
Once your dry ingredients are well mixed, it’s time to combine them with your wet mixture. Gradually add the dry ingredients to the wet ingredients, folding gently with a spatula or wooden spoon. Be careful not to overmix; you want to combine them just until the flour disappears. Overmixing can lead to tough doughnut holes, so gentle folding is key to maintaining that tender texture.
Adding the Chocolate Chips
Finally, fold in the semi-sweet chocolate chips until they are evenly distributed throughout the batter. The chocolate chips will add pockets of melty goodness in your doughnut holes, making each bite a decadent experience.
Now that you have a smooth, rich batter ready, you’re well on your way to creating these delightful chocolate doughnut holes! Stay tuned as we move on to the next steps where we will shape, bake, and enjoy these delicious treats.
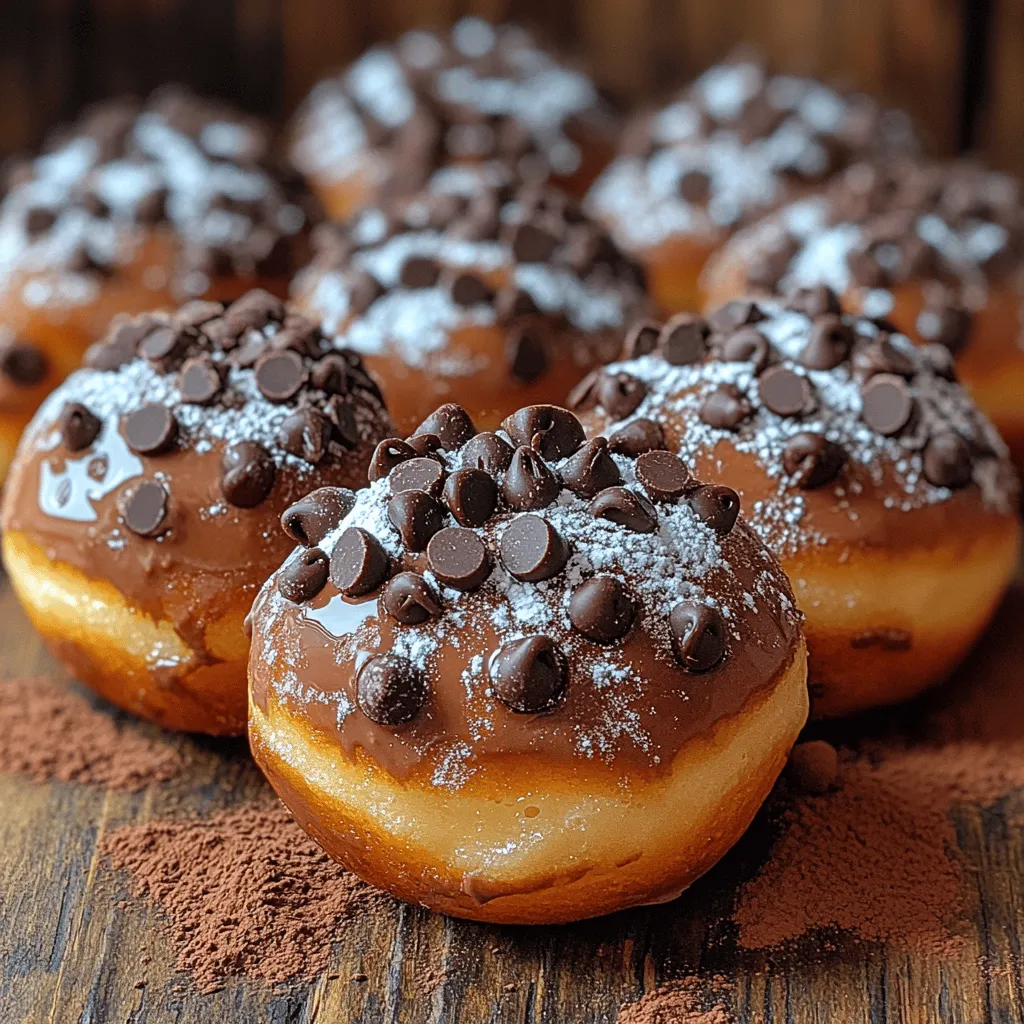
Coating Ingredients: Powdered Sugar and Cocoa
Coating your decadent chocolate doughnut holes is an essential step that enhances their overall flavor and presentation. The right coating not only adds a delightful sweetness but also balances the rich chocolate flavor of the doughnut holes. Using a combination of powdered sugar and cocoa powder creates a sweet, chocolatey exterior that complements the soft and moist interior of each doughnut hole.
The powdered sugar brings a light sweetness that contrasts beautifully with the deep flavor of the cocoa. This dual-layered coating provides a visually appealing finish while enriching each bite with a burst of flavor. The coating also helps to seal in moisture, keeping your doughnut holes soft and fresh, making every morsel a heavenly experience.
Step-by-Step Guide to Making Decadent Chocolate Doughnut Holes
Prepping the Oven and Pan
Before diving into the mixing process, it’s crucial to prepare your oven and baking pan. Preheating the oven is a must, as it ensures that the doughnut holes bake evenly, resulting in a fluffy texture. Set your oven to 350°F (175°C) and allow it to fully preheat. This step is vital, as placing dough in a cold oven can lead to uneven baking and undesirable textures.
For the mini muffin tin, it’s recommended to use a non-stick variety or lightly grease each cavity with cooking spray or butter. This precaution prevents the doughnut holes from sticking and ensures easy removal once they are baked. Additionally, consider using a silicone muffin pan, as it allows for even easier release.
Mixing Dry Ingredients: Creating the Base
Start by gathering your dry ingredients — flour, cocoa powder, baking powder, and a pinch of salt. The key to a successful batter begins with properly combining these ingredients. Use a whisk to mix them in a large bowl, ensuring that they are evenly distributed. This approach helps to avoid lumps that could disrupt the smoothness of your batter.
Incorporating cocoa powder not only adds flavor but also contributes to the overall texture. Be sure to sift the cocoa powder before adding it to the flour mixture, as this will break up any clumps and result in a smoother batter.
Combining Wet Ingredients: Achieving Smoothness
In a separate bowl, you will need to whisk together the wet ingredients: eggs, milk, melted butter, and vanilla extract. Whisking these ingredients effectively is crucial for achieving a homogeneous mixture that will blend seamlessly with the dry ingredients. Ensure that the melted butter has cooled slightly to avoid cooking the eggs upon contact.
As you whisk the wet ingredients, focus on creating a smooth mixture without any lumps. This step is essential as it ensures that the doughnut holes have a consistent texture and flavor throughout.
Folding the Mixtures: The Art of Combining
Now that you have your dry and wet ingredients ready, it’s time to combine them. Pour the wet mixture into the bowl of dry ingredients and use a spatula to fold them together gently. The goal here is to combine the two mixtures without overmixing. Overmixing can lead to tough doughnut holes, so be careful to fold until just combined, with no visible flour left.
Remember, a few small lumps are perfectly acceptable. This method preserves the lightness of the doughnut holes, which is key to achieving that melt-in-your-mouth texture.
Scooping and Baking: Perfecting the Shape
Once the batter is mixed, it’s time to scoop it into the prepared muffin tin. Using a cookie scoop or a tablespoon, fill each muffin cavity about two-thirds full. This allows enough room for the doughnut holes to rise without overflowing.
Place the filled muffin tin in the preheated oven and bake for about 10-12 minutes. Keep an eye on them, as baking times can vary slightly depending on your oven. To check for doneness, insert a toothpick into the center of a doughnut hole; it should come out clean or with a few moist crumbs clinging to it.
Cooling Process: Ensuring the Right Texture
After baking, remove the doughnut holes from the oven and allow them to cool in the pan for about 5 minutes. This cooling period allows them to firm up slightly, making them easier to remove. Carefully turn the pan upside down to release the doughnut holes onto a wire rack.
Cooling them completely on a wire rack is crucial. This step prevents steam from building up underneath, which could make the doughnut holes soggy. Proper cooling ensures that you achieve a delightful crunch on the outside while maintaining a soft and tender interior.
Preparing the Coating: Chocolatey Goodness
While your doughnut holes are cooling, you can prepare the coating. In a medium bowl, mix together powdered sugar and unsweetened cocoa powder. For a balanced flavor, a typical ratio is one cup of powdered sugar to two tablespoons of cocoa powder, but feel free to adjust to your taste. Add a pinch of salt to enhance the chocolate flavor and mix until well combined.
To create a smooth coating mixture, you can add a small amount of milk or melted butter to the dry ingredients. Start with a tablespoon and mix until you reach your desired consistency. The coating should be thick enough to adhere to the doughnut holes but still pourable.
Coating the Doughnut Holes: Tips for Success
Once your doughnut holes are completely cool, it’s time to coat them. You can choose to roll them in the powdered sugar and cocoa mixture or dip them for a more indulgent finish. If rolling, place a few doughnut holes at a time into the bowl with the coating and gently shake to cover them evenly.
If you prefer dipping, you can use a fork to lower each doughnut hole into the coating mixture, allowing the excess to drip off. Be sure to coat them thoroughly for a rich chocolate flavor. After coating, place the doughnut holes back on the wire rack to let the coating set. Allow them to rest for about 10-15 minutes to ensure that the coating adheres well.
Serving Suggestions: Enjoying Your Creation
Decadent chocolate doughnut holes are incredibly versatile and can be enjoyed in various ways. They make for an excellent dessert at parties or gatherings, providing a bite-sized treat that everyone can enjoy. Serve them alongside a glass of cold milk or a warm cup of coffee for a delightful pairing.
For a more festive presentation, consider placing the doughnut holes in a decorative bowl or on a tiered dessert stand. You can also dust them with additional powdered sugar or cocoa powder right before serving for an elegant touch.
These little treats are perfect for holiday celebrations, brunches, or as an afternoon snack. With their rich chocolate flavor, they’re sure to impress both family and friends.
Conclusion: Relishing Every Bite of Decadent Chocolate Doughnut Holes
Creating decadent chocolate doughnut holes is not just about the final product; it’s about the joy of baking and sharing delicious treats with friends and family. These delightful little bites encapsulate the rich flavor of chocolate, the softness of freshly baked goods, and the happiness that comes from indulging in a sweet treat. Whether you savor them warm from the oven or enjoy them as a delightful dessert later, these doughnut holes are a testament to the joy of homemade baking. Embrace the experience, and let each bite transport you to a world of chocolatey bliss.
The process of making these doughnut holes is not only enjoyable but also fulfilling. Each step brings you closer to the moment when you can relish the fruits of your labor. So gather your ingredients, follow these steps, and indulge in the sweet satisfaction of homemade chocolate doughnut holes. Happy baking!
